

How to Estimate Tile Flooring Quantities and Costs for Construction Projects (2026 Guide)
Tile installation isn’t just about picking a color at the showroom. It starts with numbers. Someone has to measure the floor, convert that measurement into a tile count, and price the whole job before a crew ever shows up. Nothing kills momentum faster than running short on material halfway through a job, and bad math can bring an entire schedule to a standstill while a reorder ships. Whether you’re a homeowner tackling one bathroom or a contractor bidding a 40-unit renovation, the same math applies.
For contractors preparing competitive bids, every number matters. A takeoff that’s off by even 5% on a large commercial floor can turn a profitable contract into a break-even one. This guide walks through a practical, step-by-step approach, with current 2026 pricing benchmarks, waste-factor tables, and the formulas professional estimators actually use.
1. Evaluate the Tile Schedule
Construction projects that look simple on paper often hide variables that surface only once work begins. Before calculating a single square foot, review the full project schedule to identify every area that includes tile: floors, walls, backsplashes, showers, and accent details. Assuming every room uses the same tile is one of the most common (and costly) mistakes an estimator can make. Different spaces typically call for different tile types, sizes, patterns, colors, and setting methods, and each of those variables changes labor time and material cost.
While reviewing project documents, it helps to separate two terms that get used interchangeably but aren’t the same:
- Quantity takeoff (QTO): measures the scope of work; how many square feet, how many linear feet of trim, how many transitions.
- Material takeoff (MTO): converts those measurements into actual purchasing quantities, including boxes, bags, and spare stock.
Making this distinction early reduces the risk of budget overruns later. If your firm handles multiple trades, a professional quantity takeoff service can cross-check flooring schedules against architectural drawings before pricing begins.
2. Measure the Area to Be Tiled
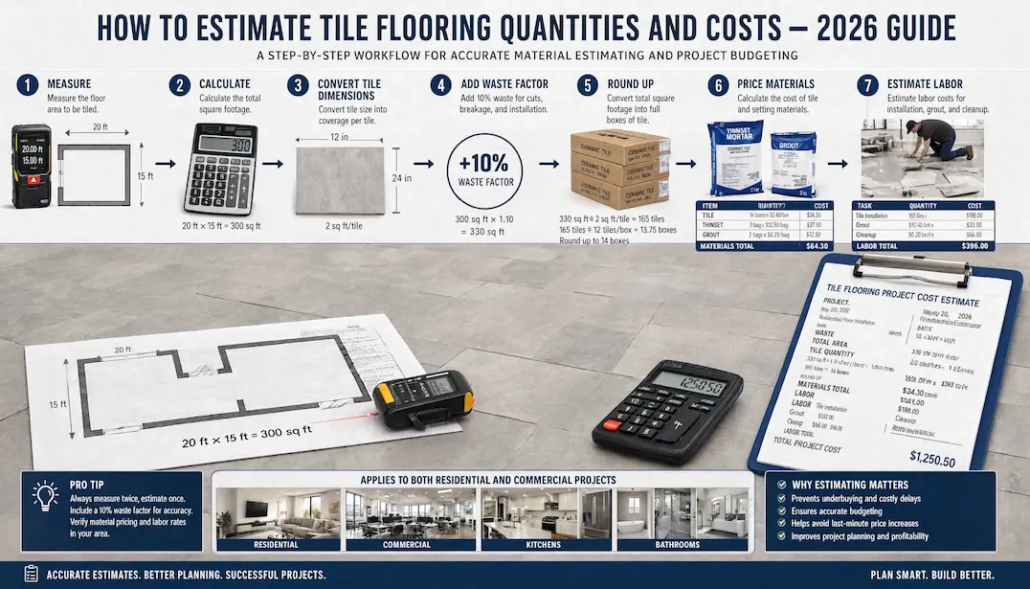
For a room with a basic square or rectangular footprint, measuring is straightforward. Use a laser measure or tape to record length and width in feet, then multiply:
Length (ft) × Width (ft) = Total Area (sq ft)
A kitchen floor measuring 20 ft by 15 ft, for example:
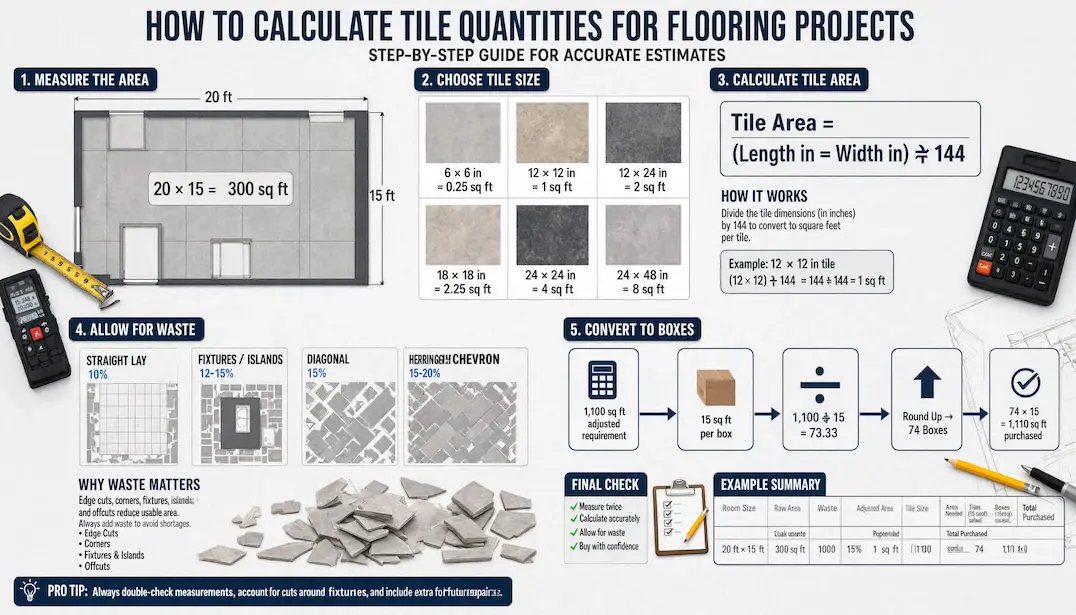
20 ft × 15 ft = 300 sq ft
Irregular or L-shaped rooms need a bit more patience. Break the floor into smaller rectangles, measure each section separately, and add the results together.
| Room Shape | Recommended Method | Common Pitfall |
| Square / rectangular | Single length × width calculation | Forgetting closets or nooks within the room |
| L-shaped | Split into 2+ rectangles, sum areas | Double-counting the overlapping corner |
| Circular / curved | Approximate with a bounding rectangle, subtract waste corners | Underestimating cut waste at curves |
| Multi-room open concept | Measure each zone independently, then combine | Treating transitions as “free” square footage |
3. Account for Tile Sizes
Tile dimensions are almost always listed in inches, so before calculating how many pieces are needed, convert the tile’s coverage to square feet:
(Length (in) × Width (in)) ÷ 144 = Tile Area (sq ft)
For a 12-inch × 24-inch tile:
12 in × 24 in = 288 sq in
288 ÷ 144 = 2 sq ft per tile
| Tile Size (inches) | Coverage per Tile | Typical Use |
| 6 × 6 | 0.25 sq ft | Mosaic accents, backsplashes |
| 12 × 12 | 1.0 sq ft | Standard residential floors |
| 12 × 24 | 2.0 sq ft | Kitchens, hallways, large-format looks |
| 18 × 18 | 2.25 sq ft | Living areas, open-concept spaces |
| 24 × 24 | 4.0 sq ft | Commercial floors, modern large-format design |
| 24 × 48 | 8.0 sq ft | High-end large-format porcelain, feature walls |
Larger-format tile reduces the number of grout lines and can speed up coverage, but it also demands a flatter substrate and more careful handling.
4. Plan for Waste and Repairs
Waste allowance is not optional. Cuts around edges, corners, and fixtures always consume more tile than the raw square footage suggests, and breakage during handling is unavoidable on any job site. Keeping a small surplus also protects you if a future repair is needed and the original dye lot is no longer in production.
| Layout Complexity | Recommended Waste Factor | Reason |
| Simple rectangular room, straight lay | 10% | Minimal cuts, mostly full tiles |
| Room with multiple fixtures or islands | 12–15% | More edge cuts around obstacles |
| Diagonal layout | 15% | Every border tile requires an angled cut |
| Herringbone or chevron pattern | 15–20% | High offcut rate; pieces can’t be reused |
| Natural stone with veining to match | 10–15% extra | Book-matching consumes otherwise usable tile |
5. Convert Square Footage into Boxes
Tile ships in boxes with a fixed coverage rating, so the adjusted total (including waste) needs to be converted into full boxes:
Adjusted Tile Area (sq ft) ÷ Coverage per Box (sq ft) = Number of Boxes Required
If each box covers 15 sq ft and the adjusted requirement is 1,100 sq ft:
1,100 ÷ 15 = 73.33 boxes
Always round up. That’s because a partial box still requires opening a full one:
Required Quantity = 74 boxes
Actual tile purchased: 74 × 15 = 1,110 sq ft.
6. Calculate Tile Material Costs
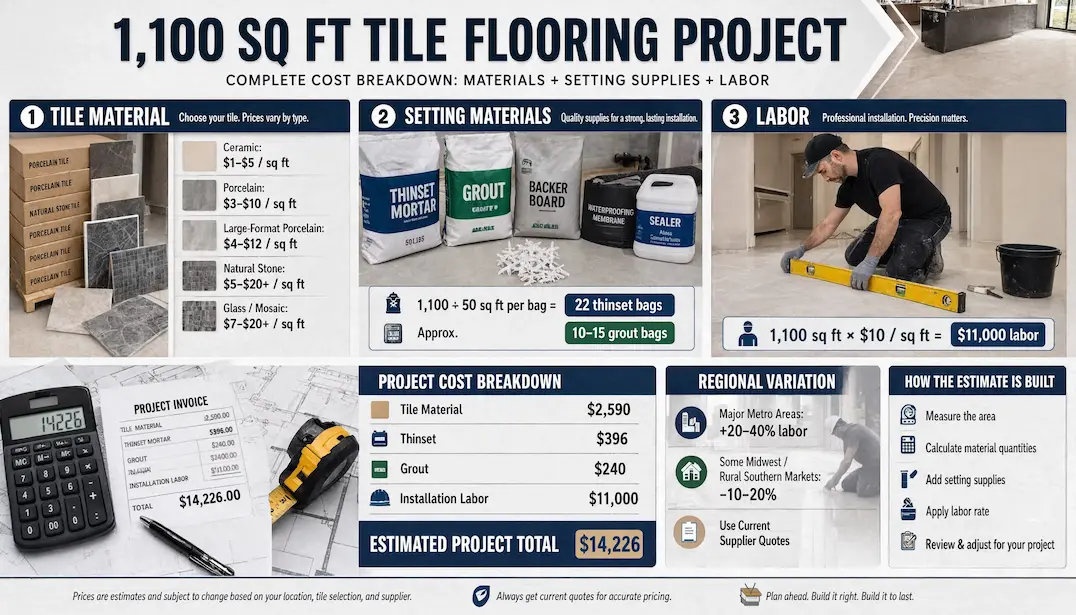
Tile pricing spans a wide range depending on material, finish, and origin. According to 2026 national pricing data, material costs by category break down roughly as follows:
| Tile Type | Material Cost per Sq Ft (2026) | Notes |
| Ceramic | $1.00 – $5.00 | Most budget-friendly; wide color and pattern selection |
| Porcelain | $3.00 – $10.00 | Denser, more durable; standard for high-traffic areas |
| Large-format porcelain | $4.00 – $12.00 | Fewer grout lines; requires flatter substrate |
| Natural stone (marble, travertine, granite) | $5.00 – $20.00+ | Price varies sharply by quarry and finish |
| Glass or mosaic | $7.00 – $20.00+ | Labor-intensive to cut and set |
Using the earlier example, 74 boxes at $35 per box:
74 × $35 = $2,590 in material cost
Always base final numbers on current supplier quotes rather than catalog list prices. That’s because tile pricing shifts with import tariffs, freight costs, and seasonal demand, and a quote that’s six months old can be meaningfully out of date.
7. Estimate Setting Materials
A complete estimate has to include all flooring options everything that goes under and around the tile, not just the tile itself:
- Thinset mortar – bonds tile to the substrate
- Backer board or membrane – required over wood subfloors or in wet areas
- Grout – fills joints; epoxy grout costs more but resists staining
- Spacers – maintain consistent joint width
- Sealer – needed for natural stone and some grout types
- Waterproofing membrane – required in showers and other wet installations per most building codes
For thinset, assuming 50 sq ft of coverage per bag on a 1,100 sq ft project:
Total Project Area (sq ft) ÷ Coverage per Bag (sq ft) = Number of Bags Required
1,100 ÷ 50 = 22 bags
Grout typically covers more area per bag than thinset (often 70–130 sq ft depending on joint width and tile size) so a 1,100 sq ft job might need roughly 10–15 bags. Always check the manufacturer’s coverage chart for the specific joint width being used, since coverage drops fast as joints get wider.
8. Estimate Tile Installation Labor
Labor is usually the single largest line item in a tile estimate, and 2026 rates vary widely by region, tile size, and layout complexity.
| Installation Type | Labor Cost per Sq Ft (2026) | Notes |
| Standard straight-lay ceramic/porcelain | $5.00 – $10.00 | Baseline residential rate |
| Large-format porcelain (18×18 and up) | $8.00 – $15.00 | Requires precise leveling systems |
| Diagonal or herringbone pattern | $10.00 – $18.00 | Significantly more cutting and layout time |
| Natural stone with sealing | $10.00 – $22.00 | Includes sealing labor and careful handling |
| Metro-area premium | +20% – 40% | Higher wage rates in coastal and major cities |
At 1,100 sq ft and a $10.00 per sq ft rate:
1,100 × $10.00 = $11,000 in labor
Or, calculated hourly; 80 labor hours at $50 per hour:
80 × $50 = $4,000
Use whichever method matches how your labor is actually billed; square-footage pricing is more common for straightforward residential jobs, while hourly billing is typical for complex commercial work with unpredictable prep conditions.
9. Calculate the Total Tile Flooring Cost
Once material, setting supplies, and labor are priced, sum them for the full project cost. Here’s how the running example comes together:
| Line Item | Quantity | Unit Cost | Total |
| Tile material | 74 boxes | $35.00/box | $2,590.00 |
| Thinset mortar | 22 bags | $18.00/bag | $396.00 |
| Grout | 12 bags | $20.00/bag | $240.00 |
| Installation labor | 1,100 sq ft | $10.00/sq ft | $11,000.00 |
| Estimated Project Total | $14,226.00 |
Regional Cost Variations to Watch For
National averages are a starting point, not a quote:
- Coastal and major metros (New York, San Francisco, Boston, LA) often run 20–40% above national labor averages.
- Midwest and rural Southern markets frequently land 10–20% below the national average.
- Material costs shift less by region but move with import tariffs on ceramic and porcelain.
- Permit fees for wet-area waterproofing vary by municipality and are easy to miss during an initial takeoff.
Tools That Speed Up Tile Takeoffs
Manual measuring works for a single room, but it doesn’t scale to multi-unit or commercial bids. Digital on-screen takeoff software lets an estimator measure directly from uploaded plans and apply waste factors instantly instead of recalculating by hand for every room. For teams that would rather hand off the measuring and pricing entirely, estimators.us offers flooring-specific construction estimating services that pair digital takeoffs with current regional pricing. It is useful when a bid deadline doesn’t leave room for manual recalculation.
Need a More Accurate Tile Flooring Estimate? Contact Our Profesionals Today!
Common Tile Estimating Errors to Avoid
Even a small math error compounds quickly across a large area. The most frequent and costly mistakes:
- Skipping the waste allowance. Every job needs cuts around edges, corners, and obstacles. Ignoring waste stalls the job while a reorder ships and can forfeit bulk-order pricing.
- Rounding down instead of up. Tile sells by the box. Always round the final quantity up to the next full box.
- Overlooking site conditions. Old floor removal, subfloor leveling, and waterproofing can quietly blow through a budget if they’re not priced during the initial takeoff.
- Skipping the final review. A second pass catches transposed numbers, missed rooms, and outdated pricing before a bid goes out the door.
- Using stale material quotes. Tile pricing shifts with tariffs, freight, and seasonal demand; a quote pulled six months ago may no longer be accurate, especially on long-lead commercial projects.
Conclusion
Accurate tile estimating comes down to a handful of repeatable steps: measure carefully, convert tile size to coverage, apply a realistic waste factor, round up to full boxes, and price material, supplies, and labor from current numbers rather than memory. None of the math is difficult on its own. For projects where the schedule doesn’t allow for manual recalculation, a detailed material estimating guide or a professional takeoff service can close the gap between a rough guess and a bid you can stand behind.
Frequently Asked Questions
How do I calculate the number of tiles needed for an L-shaped room?
Split the room into two or more rectangles, calculate the square footage of each separately, and add the totals together. Apply the waste factor to the combined square footage, not to each rectangle individually, to avoid over-ordering.
How many tiles do I need for an area measuring 30 ft × 30 ft?
A 30 ft × 30 ft space totals 900 sq ft. For 12×12-inch tile (1 sq ft each) with a 10% waste allowance for cuts and breakage, that comes to roughly 990 tiles.
How do I calculate subway tile for a herringbone layout?
Use the standard area formula, but apply a 15–20% waste factor instead of the standard 10%. Herringbone patterns generate more offcuts that can’t be reused elsewhere in the room.
How much extra tile should I keep for future repairs?
A common rule of thumb is 5–10% of the total material, stored flat and dry. This protects against future cracks or repairs if the original dye lot is discontinued.
Does wall tile need a different waste factor than floor tile?
Generally yes. Wall tile around windows, outlets, and corners often needs 12–15% waste even in a simple layout, since vertical surfaces have more interruptions than an open floor.
Should tile be purchased before or after the subfloor is inspected?
Order tile only after subfloor condition is confirmed. A subfloor that needs leveling or replacement can change the final square footage and the setting materials required, and ordering too early risks buying the wrong quantity.


