How Much Does a Concrete Slab Cost in 2026?

A concrete slab costs $6–$12 per square foot installed in 2026, with a national average of $8/sq ft. Ready-mix concrete costs $125–$175 per cubic yard delivered. Labor accounts for 45–55% of every installed price. Bids for identical scopes vary 40% by region due to labor market differences. Thickness, PSI mix, reinforcement type, and site conditions determine where a project lands within that range.

What Does a Concrete Slab Cost Per Square Foot in 2026?

A concrete slab costs $6–$12/sq ft installed for standard residential flatwork in 2026. Commercial slabs with 6-inch thickness, rebar grids, and higher PSI mixes cost $10–$18/sq ft. Decorative or stamped slabs cost $15–$30/sq ft.

The national average of $8/sq ft applies to a 4-inch residential slab with wire mesh, broom finish, and standard site prep on level, accessible ground. Actual contractor quotes reach $10–$16/sq ft when overhead, profit, mobilization, insurance, and crew loading are included; it is a gap that aggregator sites routinely understate by excluding those cost layers.

Slab Type Thickness PSI Cost Per Sq Ft
Residential patio 4 in 3,000 $6–$10
Garage floor 4–6 in 3,500 $7–$12
Driveway 5–6 in 3,500–4,000 $8–$16
Commercial floor 6–8 in 4,000+ $10–$18
Industrial / forklift 8–10 in 4,500–5,000 $14–$22+
Stamped / decorative 4 in 3,000–3,500 $15–$30
Post-tensioned 4–6 in 4,000 $12–$20

What Is the Cost Breakdown of a Concrete Slab?

Every installed concrete slab price involves four cost layers: Materials (40–50%), Labor (45–55%), Site preparation (10–15%), Equipment (5–10%). Preliminary estimating services establish these layers before contractor bids are collected.

Materials: 40–50% of Total Cost

Ready-mix concrete is the largest single material line. Standard 3,000 PSI mix costs $125–$145/yd³ delivered in most U.S. markets in 2026. Upgrading to 4,000–4,500 PSI adds $10–$40/yd³. Fiber-reinforced specialty mixes reach $175–$200/yd³. A 4-inch slab uses 1.23 cubic yards per 100 sq ft. A 6-inch slab uses 1.85 cubic yards per 100 sq ft; a 50% increase in concrete volume for the same footprint. 

Tip: Use the concrete calculator or rely on the concrete block building cost estimator to get exact cubic yards for any slab dimension before ordering.

Other Material Costs Per Square Foot:

  • Compacted gravel base (4–6 inches): $0.80–$1.50/sq ft
  • Vapor barrier (6-mil poly, per 2021 IRC minimum): $0.10–$0.15/sq ft
  • Wire mesh (6×6 W1.4/W1.4): $0.20–$0.50/sq ft
  • Rebar grid (#3 bar, 18-inch centers): $0.50–$1.00/sq ft materials only
  • Rebar grid (#4 bar, 12-inch centers): $0.80–$1.20/sq ft materials only
  • Post-tension cable system (expansive clay soils): $1.50–$3.00/sq ft
  • Fiber reinforcement (added to mix): $8–$15/yd³ surcharge
  • Forming lumber: $0.50–$1.00/linear foot of perimeter
  • Curing compound: $0.05–$0.10/sq ft

Labor: 45–55% of Total Cost

Labor is the largest cost variable in concrete slab installation. According to the U.S. Bureau of Labor Statistics 2025 OEWS release, the national mean wage for cement masons and concrete finishers (SOC 47-2051) is $28.87/hr ($60,050/yr). Payroll burden, supervision, and crew composition load that raw wages to a masonry trade billing rate of $70–$115/crew-hour on residential and commercial flatwork.

A three-person flatwork crew bills 6–10 hours for a standard 400–600 sq ft residential pour, including setup, placement, finishing, and cleanup. Labor on that pour runs $1,200–$2,400 at national average rates.

Site Preparation: 10–15% of Total Cost

Site prep is the line item most low-bid concrete quotes cut first. Proper site preparation includes excavation to depth (6–8 inches for a 4-inch slab with a gravel base), grading to establish a positive drainage slope (minimum 2% away from structures), compaction of native subgrade, placement and compaction of aggregate base, and form installation. 

Concrete Slab Cost Breakdown

Excavation and grading cost $1.50–$5.00/sq ft, depending on depth, soil type, and slope. Rocky soils or sites requiring deep cut-fill reach $6–$10/sq ft. Every half-inch of subgrade irregularity across a 1,000 sq ft slab adds approximately 1.5 extra cubic yards of concrete; a pour-day cost absent from the original quote.

Equipment: 5–10% of Total Cost

Standard flatwork equipment is factored into labor rates. Non-standard equipment carries separate line-item charges:

  • Pump truck (line pump): $150–$300/hour; required when the ready-mix truck cannot back within 50 feet of the pour
  • Boom pump: $200–$500/hour; required for second-story or long-reach pours over 100 feet
  • Concrete saw (control joints): $0.10–$0.25/linear foot

What Are the Concrete Slab Costs by Size in 2026?

Concrete slab installed cost ranges from $600 for a 10×10 shed pad to $28,000 for a 2,000 sq ft house foundation, with per-square-foot rates falling as slab size increases. Each additional inch of thickness adds $0.50–$1.25/sq ft; a 6-inch slab uses 50% more concrete volume than a 4-inch slab on the same footprint.

Common Slab Size Use Sq Ft Installed Cost Range
10×10 Shed pad, HVAC pad 100 $600–$1,200
12×12 Small patio 144 $860–$1,730
20×20 2-car garage/large patio 400 $2,400–$4,800
24×24 Standard 2-car garage 576 $3,500–$7,000
30×30 Large garage, workshop 900 $5,400–$10,800
30×40 Workshop, metal building 1,200 $6,000–$14,400
40×60 Commercial pad 2,400 $14,400–$43,200
2,000 sq ft House slab foundation 2,000 $10,000–$28,000

Minimum Thickness By Use:

  • Residential patio (foot traffic only): 4 inches
  • Residential garage floor (passenger vehicles): 4–5 inches
  • Driveway (passenger vehicles): 5 inches minimum; 6 inches preferred
  • Driveway with RV or commercial vehicle access: 6 inches minimum
  • Commercial floor (forklifts, pallet jacks): 6–8 inches
  • Industrial floor (heavy equipment, static storage loads): 8–10 inches
  • Slab-on-grade residential foundation: 4–6 inches per engineer

What Does Concrete PSI Strength Cost in 2026?

Upgrading concrete PSI strength costs $10–$40 per cubic yard above the 3,000 PSI baseline. PSI (pounds per square inch) is the compressive strength of the cured concrete mix. Higher PSI means denser mix design, more Portland cement per yard, and longer service life under load and freeze-thaw cycling.

PSI Mix Cost Per Cubic Yard Best Use Notes
2,500 PSI $120–$135 Non-structural shed pads Minimum residential grade
3,000 PSI $130–$145 Patios, sidewalks, standard slabs Most common residential spec
3,500 PSI $140–$155 Residential driveways, garage floors Good choice for vehicle traffic
4,000 PSI $150–$165 Commercial floors, freeze-thaw regions Required in many northern jurisdictions
4,500 PSI $160–$175 Industrial, high-load commercial Spec for forklift-trafficked floors
5,000+ PSI $175–$200+ Specialty industrial, bridge work Requires engineered mix design

According to the American Concrete Institute (ACI), freeze-thaw climates in the Midwest, Northeast, and Mountain West require a minimum 4,000 PSI mix with air entrainment (3–6% air content). Air-entrained mixes add $5–$15/yd³ and resist spalling and scaling from freeze-thaw cycling and deicing salts. Skipping air entrainment in those climates produces surface defects within 3–5 winters.

What Does Reinforcement Add to Concrete Slab Cost?

Reinforcement adds $0.20–$4.00/sq ft to the installed cost of a concrete slab, depending on type. Wire mesh, rebar, and post-tensioning have distinct cost profiles and structural performance characteristics.

Wire Mesh

Wire mesh (6×6 W1.4/W1.4) is a welded wire fabric placed in the slab to control surface shrinkage cracking. Material cost: $0.15–$0.25/sq ft. Installed cost: $0.20–$0.50/sq ft. Wire mesh controls surface shrinkage cracking in light-duty slabs. It does not provide structural tensile reinforcement. Wire mesh is adequate for patios, sidewalks, and shed pads. It is not adequate for driveways, garage floors, or any slab that carries vehicle traffic.

Rebar

Rebar (reinforcing bar) is deformed steel placed in a grid pattern inside the slab to resist tensile stress and prevent crack propagation.

  • #3 bar (3/8-inch diameter) at 18-inch centers: $0.50–$1.00/sq ft materials; $1.40–$2.50/sq ft installed
  • #4 bar (1/2-inch diameter) at 12–18 inch centers: $0.80–$1.20/sq ft materials; $1.80–$4.00/sq ft installed

Rebar is required by most local building departments for garage floors, driveways, and foundation slabs. Rebar positioned at mid-depth maximizes tensile performance. Rebar resting on subgrade with zero cover provides no reinforcement value; it is the most frequently observed reinforcement error on residential jobs.

Post-Tensioning

Post-tensioning is a system of high-strength steel cables tensioned after the concrete cures to compress the slab and resist soil movement. It adds $1.50–$3.00/sq ft over standard rebar, bringing the total installed cost to $12–$20/sq ft on residential slabs. Post-tensioning is the standard specification in expansive clay soil regions in Texas, Oklahoma, Colorado, and the Southwest, where soil movement cracks a conventional slab within 5–10 years. In those geologies, it is the code-minimum solution, not a premium upgrade.

Build with confidence. Get precise concrete slab cost estimates from experienced construction estimators.

What Is Included in a Concrete Slab Estimate?

A complete concrete slab estimate includes 16 standard line items. Professional building estimating services itemize every line before the bid goes out. The most common source of cost disputes is a base bid that omits site prep, curing, and permit fees.

Standard inclusions in a complete bid:

  • Site survey and layout (establishing grades, setting control points)
  • Excavation to design depth (typically 6–8 inches below finish grade)
  • Native subgrade compaction (minimum 95% Standard Proctor in most jurisdictions)
  • Aggregate base course, 4–6 inches compacted (AASHTO #57 stone or equivalent)
  • Form installation with proper bracing and grade stakes
  • Vapor barrier installation (minimum 6-mil polyethylene per IRC 2021, 10-mil preferred)
  • Reinforcement, mesh or rebar per specification, positioned at the correct depth.
  • Ready-mix concrete, specified PSI, slump, and admixtures; confirmed on batch ticket.
  • Concrete placement and consolidation (vibration on thicker pours)
  • Screed and leveling (laser screed on commercial, hand screed on standard residential)
  • Bull float, hand float, and power trowel finishing
  • Edge detailing and control joint tooling or sawing (joints spaced at 8–12 feet on center)
  • Curing compound application or wet cure covering
  • Form removal after 24–48 hours
  • Cleanup and concrete washout per local environmental rules
  • Permit fees (where required, typically $50–$500 depending on jurisdiction and project type)

Items not included in most base bids (quote them separately):

  • Demolition and haul-off of existing concrete: $3–$8/sq ft
  • Geotechnical soil testing: $1,000–$5,000 (required on commercial; advisable on poor soils)
  • Drainage piping or French drains
  • Decorative scoring, staining, or sealing beyond basic broom finish
  • Second-coat sealing
  • Underground utility relocation
  • Excavation deeper than 6 inches (poor soils, high water table)
  • Engineering fees (required for post-tensioned slabs and commercial loading)

What Are the Regional Concrete Slab Costs in 2026?

Region is the single largest cost variable outside of slab specification, producing a 40%+ cost difference for identical scopes across U.S. markets.

Region Installed Cost Range vs. National Average
Southeast (AL, GA, MS, SC) $6–$9/sq ft –10 to –20%
Texas / South-Central $6–$10/sq ft –10 to –15%
Florida $7–$11/sq ft Near average
Midwest (OH, IN, IL, MO) $7–$11/sq ft Near average
Mountain West (CO, UT, AZ inland) $8–$13/sq ft +5 to +15%
Pacific Northwest (WA, OR) $9–$15/sq ft +15 to +30%
California $12–$18/sq ft +35 to +55%
New York / Northeast $12–$18/sq ft +35 to +55%

A 400 sq ft patio costing $2,800 in Tennessee costs $4,200–$5,600 in California for the same specification. The difference is entirely labor. According to BLS 2025 OEWS state data, labor costs are rising 3–5% annually in 2026, while concrete material prices stabilized after 2025 volatility.

What Is a Concrete Slab Foundation Cost vs. Other Foundation Types?

A concrete slab-on-grade foundation costs $5–$14/sq ft installed in 2026, which is the least expensive residential foundation type. According to the U.S. Census Bureau’s New Residential Construction data (2024), 75% of U.S. homes use slab foundations. The foundation cost per square foot ranges from $5–$14 for a slab to $35–$50 for a full basement before interior finishing.

Foundation Type Cost Per Sq Ft Total Cost (2,000 sq ft house)
Concrete slab $5–$14 $10,000–$28,000
Crawl space $8–$18 $16,000–$36,000
Full basement (unfinished) $35–$50 $70,000–$100,000
Pier and beam $10–$25 $20,000–$50,000

Slab foundations perform best in warm-to-temperate climates with flat terrain and stable, well-drained soil. They perform poorly in northern climates with deep frost penetration and on expansive clay soils without post-tensioning.

How Can You Read a Concrete Slab Bid in 2026?

A legitimate concrete bid specifies slab dimensions, thickness, PSI, reinforcement type and spacing, sub-base depth, finish type, control joint plan, curing method, and all exclusions. A bid showing only a total number with no line items is not a complete bid.

Red Flags in a Concrete Bid

  • No specified PSI, no mention of base preparation depth or compaction standard.
  • Wire mesh only on a garage floor or driveway.
  • No control joint specification.
  • No curing method specified.
  • Price below $5.50/sq ft in average-cost markets.
  • No written exclusions.

What Separates a $7/sq ft Bid from a $12/sq ft Bid (Same Footprint)?

Line Item $7/sq ft Bid $12/sq ft Bid
Sub-base depth 2–3 inches, uncompacted 4–6 inches, compacted to 95% Proctor
Concrete PSI 3,000 4,000 with air entrainment
Reinforcement Wire mesh only #4 rebar, 12-inch centers
Finish Basic broom Power trowel + hand tool edges
Control joints Tooled only Saw cut within 6–12 hours of pour
Curing None specified The curing compound is applied the same day
Permit Excluded Included

Concrete Slab Types _ Size

What Are the Hidden Costs in a Concrete Slab Project?

Six cost items appear on concrete invoices that most base bids do not include, adding $200–$1,000+ to the final total.

  • Short-Load Surcharges

Orders under 3–4 cubic yards trigger surcharges of $50–$150 per yard under the minimum. A 100 sq ft pad needing 1.5 yards costs $200–$300 more in concrete delivery fees than the per-yard rate implies.

  • Wait-time Charges

Ready-mix trucks bill $2–$4 per minute after the first 5–7 minutes per yard. A slow pour caused by pump problems, site access delays, or crew shortage adds $200–$600 in wait-time charges.

  • Delivery Mileage Overages 

Standard delivery radius is 15–20 miles from the batch plant. Miles beyond that radius cost $5–$10 each way. Rural projects 30+ miles from the nearest plant pay $100–$200 in delivery premiums per truck.

  • Weekend or Off-Hours Delivery

Saturday delivery premiums run 10–20% over weekday rates. Projects requiring concrete delivery before 6 AM or after 5 PM pay similar premiums.

  • Washout Fees

Sites without a designated concrete washout area pay $25–$75 per truck; it is an environmental compliance charge, not optional.

  • General Contractor Overhead

A GC managing a concrete subcontractor adds 13–22% overhead and profit markup on top of the sub’s price. The same pour costs 15–22% more on a GC-managed job than on a direct-hire basis.

FAQs

Does a concrete slab need a gravel base?

Yes. A compacted gravel base (4–6 inches minimum) provides drainage, prevents subgrade erosion, and reduces slab cracking. A 4-inch slab on a proper gravel base outperforms a 6-inch slab on uncompacted native soil. The gravel base is the most important durability factor that low-bid contractors remove from quotes.

How long does a concrete slab take to cure?

Concrete reaches the initial set in 24–48 hours. Foot traffic is safe after 24–48 hours. Passenger vehicles stay off for 7 days. Heavy vehicles require 28 days, when standard 3,000–4,000 PSI mixes reach design compressive strength. According to ASTM C1074 (Estimating Concrete Strength by the Maturity Method), cold weather below 50°F slows curing chemistry and extends all those timelines.

What is the right control joint spacing for a concrete slab?

Control joint space at 8–12 feet on center in each direction. According to ACI 360R-10 (Guide to Design of Slabs-on-Ground, American Concrete Institute), joint spacing equals 24–36 times the slab thickness in inches; a 4-inch slab gets joints at 8–12 feet; a 6-inch slab gets joints at 12–18 feet. Joints are sawn within 4–12 hours of pouring or tooling immediately after finishing.

Can you pour concrete in cold weather?

Concrete poured below 40°F without protection does not achieve design strength. Cold-weather pours use heated enclosures, insulated blankets, or accelerating admixtures (calcium chloride at $5–$10/yd³ surcharge). Concrete placed on frozen subgrade fails regardless of mix design. According to ACI 306R (Guide to Cold Weather Concreting, American Concrete Institute, 2010), concrete temperature at placement stays above 50°F throughout the curing period on compliant cold-weather pours.

Conclusion

A concrete slab costs $6–$12/sq ft installed in 2026. Budget $7–$9/sq ft for a standard 4-inch residential slab with proper base, reinforcement, and broom finish. Budget $10–$13/sq ft for 4,000 PSI, #4 rebar, and air entrainment in freeze-thaw or vehicle-traffic applications. Budget $12–$18/sq ft in California and the Northeast. Commercial flatwork starts at $10/sq ft. Any bid below $5.50/sq ft is missing scope. Any bid without specified PSI, reinforcement type, base depth, and curing method cannot be properly evaluated. 


Getting three written bids is the minimum standard, but only if all three bids are scoped identically. Most homeowners and developers lose money comparing bids that describe different slabs. USA Estimators provides professional concrete construction estimating services with precise, itemized cost breakdowns by market, before contractor bids are collected.

Request a concrete estimate from USA Estimators.

Quantity Takeoff vs Material Takeoff

Quantity Takeoff vs Material Takeoff: A Complete Guide

Quantity takeoffs and material takeoffs are core documents in construction estimating, procurement planning, quantity surveying, and CSI MasterFormat-based bid preparation. Most builders confuse one with the other. This single mistake ruins their project budget, creates under-priced bids, and causes major material shortages on the job site.

The fix is simple: use a quantity takeoff to find raw engineering dimensions for your cost estimates, and use a material takeoff to turn those numbers into exact commercial buying units with waste factors included. This guide breaks down the precise differences between the two documents so you can protect your profits and stop procurement errors before they start.

What Is a Quantity Takeoff in Construction?

A Quantity takeoff (QTO) involves the accurate measurement of all physical components within a construction project, derived directly from blueprints, structural designs, and mechanical, electrical, and plumbing (MEP) details. It quantifies resources by cubic measure, surface area, linear footage, or unit enumeration. QTO also measures labor hours per trade per activity and equipment days per piece of machinery. A QTO is not a list of things to buy. It is the total resource demand for a project.

A concrete slab QTO line item, for example, 450 CY of 4,000 psi concrete, 18 hours of forming and placement labor, and 1 pump truck day. That single line covers three cost categories. Without all three, the bid is incomplete.

What Does a Quantity Takeoff Measure?

A QTO measures four resource categories: materials, labor, equipment, and subcontracted work.

QTO Category Component Examples Primary Unit
Materials Earthwork, concrete volume, structural steel, piping Cubic yards, tons, linear feet
Labor Carpentry, electrical rough-in, and masonry placement Man-hours per trade per activity
Equipment Tower cranes, excavators, and concrete pumps Operational hours or equipment days
Subcontract Fire suppression, elevator installation Lump-sum or per-unit scope packages

Site work and temporary works also appear in a QTO. Formwork, shoring, scaffolding, and dewatering systems carry measurable costs. A QTO that omits them is incomplete before the first trade starts.

Quantity Takeoff estimations

When is a QTO Generated, and Who Creates It?

Professional estimators, quantity surveyors, and project managers produce QTO documents. Timing sits in the pre-bid phase, design development, and pre-construction stages. Input documents include architectural blueprints, structural engineering drawings, and MEP site plans. Output is a cost estimate, a bid submission package, or the baseline project budget.

AACE International classifies estimating accuracy across five levels tied directly to how complete the project definition is at the time of the QTO:

AACE Cost Estimate Classification Matrix

Classification / Stage Accuracy Range Project Definition
Class 5 (Concept Screening) -20% to +50% 0% to 2%
Class 4 (Feasibility Study) -15% to +30% 1% to 15%
Class 3 (Budget Authorization) -10% to +20% 10% to 40%
Class 2 (Pre-Bid / Tender) -5% to +15% 30% to 70%
Class 1 (Check Estimate) -3% to +10% 70% to 100%

Professional quantity takeoff services deliver Class 3 to Class 5 documents during the design and pre-bid stages. The accuracy class directly determines the acceptable contingency margin in a budget.

How Does a Quantity Takeoff Connect to the Bill of Quantities?

A QTO becomes a Bill of Quantities (BOQ) when its raw measurements are organized by CSI MasterFormat divisions and assigned specific line-item costs. The BOQ is the document used in competitive bidding on public and commercial projects under the design-bid-build delivery method. Every general contractor submitting a bid works from the same BOQ baseline, which keeps pricing comparable across bidders. The QTO is the raw data. The BOQ is the structured output of that data.

What Is a Material Takeoff in Construction?

A Material Takeoff (MTO) is a procurement document. It takes the raw measurements from a QTO and converts them into commercial purchasing units. An MTO does not measure project scope. It tells a supplier exactly what physical products to deliver and in what quantity. The difference between a QTO measurement and an MTO order quantity is the difference between 4,200 SF of drywall and 145 sheets of 4×8 Type X gypsum board.

What Does a Material Takeoff Include?

An MTO contains seven data fields for every line item: material name and specification, QTO raw quantity, waste factor percentage, converted order quantity, purchasing unit, unit cost, and total extended cost. All seven fields must be present. A list missing any one of them is not an actionable MTO.

Construction Material Take-Off (MTO) Ledger

Item Specification QTO Qty Waste % Order Qty Unit Unit Cost Total Cost
Drywall Type X Fire-Rated 5/8″ 4,200 SF 10% 145 4×8 Sheets $32.00 $4,640.00
Rebar #4 Deformed Grade 60 2,400 LF 8% 130 20-ft sticks $14.50 $1,885.00

Every row on the MTO maps directly back to a measured line on the QTO. The MTO does not generate new quantities. It refines existing ones for commercial use.

Who Executes the Material Takeoff, and for What Purpose?

Four roles use an MTO after it is produced. After the QTO defines project scope, procurement managers use the MTO to issue RFQs based on converted purchasing quantities. Suppliers generate binding material proposals from it. Project managers build delivery schedules against the construction timeline from it. Subcontractors review it to confirm scope allocations before starting work.

An MTO without downstream distribution is a document sitting in a folder. Its value is in the procurement actions it triggers.

What Is a Waste Factor and Why Does MTO Need One?

A waste factor accounts for geometric cutting loss, material damage, site breakage, and over-pour requirements. Waste-factor adjustments directly affect procurement scheduling, supplier forecasting, field inventory control, and subcontractor sequencing.

Without a waste factor, an MTO produces a guaranteed supply shortfall. According to RSMeans Building Construction Cost Data and the National Association of Home Builders (NAHB) construction cost studies, standard waste factors by material type are:

Standard Estimating Waste Allowance Guide

Material Type Standard Waste Allowance Main Cost & Cutting Drivers
Drywall / Gypsum Board 10% to 15% Geometric cutting layout, room perimeter waste, board damage
Framing Lumber 5% to 10% End-cuts, crooked studs, field design modifications
Ready-Mix Concrete 5% to 8% Over-pour allowance, ground absorption, spillage, and pump priming
Bricks & Masonry Units 10% Cutting corners/openings, transit breakage, pallet handling
Rebar / Structural Steel 5% to 10% Lap splicing, drop cuts, and bending adjustments
Electrical Wire (Conduit Pulls) 10% to 12% Box makeup lengths, pull tension trimmings, and spool ends

An MTO that uses raw QTO numbers directly for purchasing orders, the wrong quantity every single time. The waste factor bridges the gap between engineering math and field reality.

What Is the Core Difference Between a Quantity Takeoff and a Material Takeoff?

A Quantity Takeoff calculates total project volume, labor, and equipment for bidding. A Material Takeoff converts physical product measurements into purchasable commercial units for procurement. They are not competing documents. They serve different phases of the project pipeline.

What Does Each Document Actually Cover?

Attribute Quantity Takeoff (QTO) Material Takeoff (MTO)
Materials Tracked Yes (raw engineering measurements) Yes (converted to purchase units)
Labor Hours Yes (crew hours per activity) No
Equipment Costs Yes (machinery time frames) No
Waste Factors Not typically included Required
Vendor Specifications Not included Required
Order Quantities Net architectural dimensions Standard commercial packaging units
Primary Use Cost estimation and bid generation Procurement and inventory purchasing

Does a Quantity Takeoff Always Come Before a Material Takeoff?

Yes. A QTO always precedes an MTO. The MTO is derived from QTO measurements. No accurate purchasing list exists without verified geometric counts from completed drawings.

The workflow is linear and non-reversible:

Attempting to build an MTO from unverified field estimates or partial drawing sets produces incorrect order quantities. The cost of that error appears at delivery, not at the desk.

Ready to Win More Projects?

What Are the Different Outputs of a QTO vs an MTO?

QTO output packages include comprehensive cost estimates, final bid prices, baseline project budgets, formal contract BOQs, and subcontractor scope packages. These outputs go to owners, general contractors, and bid review committees.

MTO output packages include material procurement lists, vendor RFQ sheets, legally binding purchase orders, material delivery schedules, and supplier comparison matrices. These outputs go to vendors, procurement managers, and field supervisors.

The two document sets serve two completely different audiences with two completely different needs.

When Should You Use a Quantity Takeoff vs a Material Takeoff?

The correct document depends on the project phase and the decision being made.

At What Point Does a Quantity Takeoff (QTO) Become Essential?

Use a QTO when preparing a competitive bid for a general contractor or project owner. Use it during design development to build the initial project budget. Use it when evaluating contract risk for a lump-sum versus unit-price agreement. Construction estimating services also rely on QTO data when preparing subcontractor scope packages and performing value engineering analysis on alternative materials or structural systems.

When Does a Project Require a Material Takeoff (MTO)?

Use an MTO when issuing RFQs to material suppliers. Use it when generating purchase orders for field materials. Use it to build material delivery schedules against a Gantt chart construction timeline. Quantity surveyor services apply MTO data when verifying subcontractor material invoices before payment approval and when tracking actual material expenditure against the original baseline estimate.

Do You Always Need Both Documents?

Yes, on every project above the basic residential scope! A QTO without an MTO gives an accurate bid price but generates chaotic procurement with frequent field shortages. An MTO without a QTO gives a functional purchasing list but lacks labor costs, equipment allocations, and schedule context.

In fact, A 2022 McKinsey analysis of more than 500 capital projects found that cost overruns averaged at least 79% above initial budget estimates, with the root cause traced directly to poor front-end project definition and misaligned pre-construction processes.

Another McKinsey report, Imagining Construction’s Digital Future (2016), confirmed that large projects typically run up to 80% over budget and 20% longer than scheduled. Projects that separate estimating from procurement, rather than connecting the two through QTO-to-MTO workflow, account for a large share of that figure.

Professional construction takeoff services deliver both documents as part of an integrated pre-construction package. The two documents together close the gap between winning a bid and executing it profitably.

What Do QTO and MTO Look Like in Practice Across Different Trades?

The difference between a QTO and an MTO becomes crystal-clear at the trade level. Numbers make the distinction concrete.

Concrete Work

QTO line items:

  • Foundation walls: 320 CY of 4,000 PSI concrete mix
  • Formwork contact area: 8,400 SF of temporary plywood forming
  • Placement labor: 160 man-hours for pouring and finishing crews
  • Equipment: 2 days of boom pump truck operations

MTO line items from the same scope:

  • Ready-mix supply: 340 CY (includes 6% waste factor)
  • Formwork materials: 260 sheets of 3/4-inch BB plywood panels
  • Reinforcement steel: 14.2 tons of #5 rebar stock lengths
  • Form ties: 1,200 units of heavy-duty snap ties

The QTO measures scope and cost drivers. The MTO converts those drivers into supplier-ready order quantities. Concrete estimating services produce both layers for every pour sequence.

Framing Wood Work

QTO line items:

  • Exterior wall framing: 2,800 LF of 2×6 structural framing
  • Floor joist framing: 4,200 LF of engineered I-joists
  • Installation labor: 220 framing crew man-hours
  • Equipment: 3 days of telehandler forklift operation

MTO line items:

  • Framing lumber: 385 pieces of 2×6 No. 2 Prime SPF lumber, 10-ft lengths
  • Bottom plates: 60 pieces of 2×6 pressure-treated lumber, 16-ft lengths
  • Floor sheathing: 140 sheets of 23/32-inch T&G OSB subfloor panels
  • Fasteners: 4 boxes of 3-inch bright common framing nails

Framing estimating services use the LF count from the QTO and convert it to stud counts, plate lengths, and sheathing sheets. Without that conversion, the lumber yard quote is for the wrong product mix.

Electrical Work

QTO line items:

  • Branch circuitry: 12,500 LF of branch circuit conduit runs
  • Lighting fixtures: 340 recessed LED troffer fixtures
  • Installation labor: 480 licensed electrician man-hours
  • Equipment: 5 weeks of scissor lift operations

MTO line items:

  • Bulk wire: 14,000 LF of 12 AWG THHN copper wire on 1,000-ft spools (includes 12% pull waste factor)
  • Fixture procurement: 340 Lithonia Lighting units with specified color temperatures and model numbers
  • Junction elements: 180 pieces of 4-inch square metallic boxes with covers
  • Delivery hardware: 45 packages of 1/2-inch one-hole steel conduit straps

Electrical estimating services apply a 12% pull waste factor to branch wire because wire waste in conduit pulls is significantly higher than in open-air installations. A QTO that shows 12,500 LF without that correction produces a wire order that runs short in the field.

Masonry Work

QTO line items:

  • Brick veneer: 5,600 SF of exterior wall coverage
  • Scaffold setup: 4,800 SF of multi-tier staging assembly
  • Mason labor: 380 mason and tender man-hours
  • Equipment: 4 weeks of mortar mixer rental

MTO line items:

  • Facing brick: 38,360 modular facing bricks on pallets (6.85 bricks per SF, plus 10% cutting and breakage waste)
  • Mortar blend: 115 bags of Type N masonry mortar mix
  • Masonry sand: 14 tons of clean, washed masonry sand
  • Structural ties: 1,400 pieces of adjustable corrugated brick ties

Masonry estimating services apply the 6.85 bricks-per-SF conversion from the Brick Industry Association’s standard coursing tables, then add the 10% waste factor for field cuts. A QTO showing 5,600 SF means nothing to a brick supplier who needs a pallet count and unit type.

Material Takeoff estimations

What Are the Real Financial Risks of Confusing QTO and MTO?

Budget overruns tied to takeoff errors are well documented. According to the McKinsey Global Institute, large construction projects average 80% over budget and run 20 months behind schedule due to systematic scope definition errors at the pre-construction stage. According to the KPMG Global Construction Survey 2015, only 31% of projects came in within 10% of their budgeted cost over three years, and 69% of owners identified execution failures as a primary driver of cost overruns.

These numbers are not abstract. They trace directly to the pre-construction documents that estimators produce, or fail to produce, before the first shovel hits the ground.

What Goes Wrong When You Use an MTO Instead of a QTO for Bidding?

An MTO used as a bid document produces a price with major gaps. Because an MTO excludes labor hours, equipment configurations, and operational overhead, the resulting bid omits the most volatile expenses on any jobsite. Man-hours for assembly, equipment mobilization fees, and specialty subcontracted scope all disappear from the number. The submitted bid appears competitive because it is incomplete. The project loses money from day one.

What Goes Wrong When You Use a QTO for Purchasing?

Using raw QTO dimensions directly for purchasing produces ordering errors. Engineering dimensions do not match commercial packaging units.

A practical example: A QTO measures 4,200 SF of drywall for interior partitions. Drywall is sold in standard 4×8 sheets. The conversion and waste calculation works like this:

  1. Area per sheet: 4 ft x 8 ft = 32 SF
  2. Raw sheet count: 4,200 SF / 32 SF per sheet = 131.25 sheets
  3. Apply 10% waste factor for geometric cuts: 131.25 x 1.10 = 144.375 sheets
  4. Round up to the nearest whole commercial unit: order 145 sheets

Ordering 131 sheets based on raw QTO dimensions leaves the crew short by 14 sheets. That shortfall halts drywall installation, triggers a secondary delivery charge, and delays downstream finishing trades. The MTO exists specifically to prevent this.

How Do Professional Estimating Services Handle QTO and MTO?

Professional construction estimating companies produce both documents as part of a complete pre-construction package. A QTO alone leaves procurement unmanaged. An MTO alone lacks the budget context that drives decision-making. The two documents together give contractors an accurate bid price and an execution-ready purchasing plan.

At estimators.us, QTO documents are produced to AACE Class 3 to Class 5 standards, organized by CSI MasterFormat divisions, and delivered within a 10 to 48-hour turnaround. MTO packages include waste-adjusted order quantities, purchasing unit conversions, and vendor-ready RFQ formatting. Both services are available independently or as a combined pre-construction package.

Inaccurate takeoffs lead to budget overruns and field delays. Precise, data-driven estimates prevent both. Contact our dependable estimators for professional QTO and MTO services for your next project.

Frequently Asked Questions

Is a quantity takeoff the same as a material takeoff?

No, a QTO measures all project resources, including materials, labor, and equipment, for cost estimation. An MTO isolates material items, applies waste factors, and converts measurements into commercial purchasing units for procurement.

Who is responsible for completing a material takeoff?

Procurement managers and professional estimators produce MTOs. On large commercial projects, a purchasing agent or procurement specialist manages the MTO after the lead estimator completes the QTO.

How accurate does a takeoff need to be before bidding?

A Class 2 pre-bid estimate carries -5% to +15% accuracy based on 30% to 70% project definition. That is the accepted accuracy standard for a competitive bid submission in building and general construction.

What software is used for QTO and MTO?

Common tools include PlanSwift, Bluebeam Revu, Trimble Accubid, and RS Means Cost Works. Each handles measurement scaling, unit conversion, and cost database integration differently. The tool matters less than the completeness of the underlying drawing set.

How is a waste factor calculated in a material takeoff?

Waste factor is applied by multiplying the raw QTO quantity by (1 + waste percentage). For 4,200 SF of drywall with a 10% waste factor: 4,200 x 1.10 = 4,620 SF, which converts to 145 sheets.

Can one takeoff document serve both bidding and purchasing?

No, a QTO includes labor and equipment data that are irrelevant for a purchase order. An MTO includes vendor specifications and commercial packaging units that are irrelevant for a bid. Each document is built for a different audience and a different decision.

What is the AACE Class 3 estimating accuracy?

A Class 3 estimate carries -10% to +20% accuracy. It is produced with 10% to 40% project definition and serves as the budget authorization document used in design development and owner approval stages.

What is the difference between a BOQ and a QTO?

A QTO is raw measurement data extracted from drawings. A BOQ organizes that data by CSI MasterFormat® divisions, assigns unit costs, and formats it for formal contract tendering. Every BOQ begins as a QTO. Not every QTO becomes a BOQ.

5 HVAC System

5 HVAC System Upgrades That Lower Long-Term Building Maintenance Costs

The homes with the lowest HVAC repair bills aren’t the ones with the best service plans. They’re the ones running equipment that doesn’t break in the first place. Most homeowners spend years overpaying for emergency calls and replacement parts before realizing the real lever sits upstream, in the equipment itself.

That’s the pattern the team at Expert HVAC Services by A/C Man Heating and Air sees across home retrofits in Northwest Arkansas: five specific upgrades quietly remove the failure modes that drive most of your service spend, and once they’re in place, HVAC maintenance stops being reactive and starts being predictable.

1. Smart Thermostats and Home Automation

Smart controls are usually the highest-ROI HVAC upgrade you can make, and they make every other upgrade on this list work harder.

A modern smart thermostat does more than hold a schedule. The current generation learns occupancy patterns, tracks humidity, monitors runtime, and flags abnormal system behavior before it becomes a service call.

ENERGY STAR-certified thermostats are smart solutions that save households 8% annually. But that’s not all! The thermostat sets back the system instead of holding a fix target. This phenomenon ensures you compressor cycles less and drop total runtime. Eventually, your component’s life is extended significantly.

When it comes to maintenance, thermostats are one of the most reliable upgrades. Modulating controls manage the system efficiently instead of slamming it on and off. At the same time, compressors cycle less, blower motors start fewer times, and gas furnaces ramp up slowly. All of this leads to less wear and fewer service calls. As a result, the equipment life is increased, and the repair budget becomes predictable instead of being reactive.

Home Automation

2. Variable-Speed (Inverter-Driven) HVAC Systems

A single-stage AC/heat pump running at traditional workflows has only one functional speed. It goes on full blast. On the contrarym variable speed systems have specialized inverter compressors and ECM blowers. These can ramp the output up or downspeed on demand. This is the same logic that makes a modern car last longer than 1990s one. That means variable speed HVAC systems will also last longer compared to typical single-stage systems.

That single change does two things for your long-term costs. It dramatically reduces wear on the compressor, the single most expensive component in your system, and the efficiency gain is significant. Per the U.S. Department of Energy, modern air-source heat pumps deliver two to four times more heat energy than the electricity they consume, with variable-speed models cutting heating electricity use by up to 75% versus electric resistance systems.

In practice, hard-start compressors fail earlier and louder. Soft-starting through an inverter pushes typical compressor life from 10 to 12 years closer to 15+ in residential applications. The system also dehumidifies far better than a single-stage unit, which is the second most common comfort complaint after temperature itself.

3. Higher Efficiency Heat Pumps And System Replacement

There comes a time when it is more expensive to patch a 15-year-old system than to replace it.

The new generation of highly efficient heat pumps and ACs save up to 20%-40% on energy costs compared to units 10-15 years ago, and SEER2 ratings in the high teens are unmatched by older systems. Consider any utility rebates or state incentives, and the payback period is usually 3-7 years.

The maintenance argument is the argument which is most often missed by homeowners. Modern systems are designed using standardized parts, have on-board diagnostics and do not employ refrigerants that are being phased out. R-22 systems are especially painful: No more production of this refrigerant, and any leak repair is quite expensive compared to the work itself. When your system is R-22 or older than 15 years, it is no longer a cost decision. The question is how much you are losing on the wait.

Ready to Win More Projects?

4. Zoning Systems

The majority of dwellings temperature control unused rooms. Your house is divided into separate thermal zones, with individual thermostats and dampers in each, thus preventing the bedrooms from cooling down at 2 pm or the south-facing living room from being the boss over the basement. Energy savings from residential zoning usually range from 20% to 30% for multi-story and large, single-story residences.

The benefits of maintenance are due to less equipment cycling. If one system is used for all rooms, it cycles at a high pace and will last less time. If zones are only on when occupied, then each zone in the system operates closer to the steady state load for the majority of the time. This is literally easier on the compressor, blower, and refrigerant lines.

But the comfort side is no less important. Two of the most common complaints we hear is the hot bedrooms in summer and the cold rooms in winter. Zoning can address both of these issues.

5. Water Filters and Water Treatment Systems

These are two smaller upgrades that, when combined, have a weight that is above their size.

ECMs are electronically commutated motors that operate much more efficiently than the older PSC motors. They are brushless, meaning that they have fewer mechanical failure points and will last longer. The U.S. Department of Energy also states that variable-speed blower motors also help to regulate airflow when the unit is operating at part-load, which helps overcome the problem of clogged coils, dirty filters and limited ducting. This upgrade usually recoups its cost in 3-4 years based on reduced electric costs and the elimination of electric service calls.

MERV 13 Filtering with UV-C Coil Treatment. Dirty coils are the silent killers of HVAC efficiency. Any amount of fouling results in longer runtimes, increased pressures and increased wear rates of all downstream components. Using a higher filter rating (MERV 13) will capture smaller particles before they enter the coil, and UV-C lights will kill biofilm and microbial growth on the surface of the coil. The two combine to lengthen the service life of the coil by several years and reduce the number of pro coil cleanings by 50%.

If you can only do one improvement this year, then this is the easiest place to begin.

Water Filters and Water Treatment Systems

What a Smart Upgrade Sequence Actually Looks Like

The biggest error homeowners make is considering these improvements as separate projects, one at a time. They’re not. They compound.

If it’s a smart thermostat, but it doesn’t have a variable-speed system, there’s nothing smart about it. A high-efficiency heat pump with no zoning system conditions the entire house even if only one room is in need of conditioning. True long-term savings are in upgrading the system, not the parts.

The order is easy to follow for most homes. The low cost base is a smart thermostat and MERV 13 filtration. Consider ECM blower and zoning as mid-tier improvements. Wait for the end of 12-15 years of your current system or when you see repeat failures before you consider a full system replacement. If you’re considering what to upgrade first, A/C Man Heating and Air walks you through each upgrade in order of payback so you know where that next dollar will go the farthest for you.

FAQ

Which HVAC upgrade will pay off the quickest?

Energy savings and reduced service calls typically make smart thermostats and high-efficient filters the highest payback items, usually within 18 months or less. A variable-speed system replacement takes 3-7 years depending on the current equipment and rebates available.

What is a realistic reduction in long-term HVAC costs for these upgrades?

With the full upgrade stack installed in most homes, total HVAC repair/replacement costs can be reduced by 30-50% over a 10 year period. The primary source of savings is the changeover from the emergency repair approach to planned and predictable maintenance.

Do these improvements make sense for older homes?

Yes. Older houses can experience greater value increases, as the existing equipment is less efficient and on the verge of failure. The math is easier to do on the retrofits than it is to do on aging systems.

Do these upgrades mean that I need to replace my HVAC system?

Existing equipment can be retrofit with a smart thermostat, ECM motor replacement, zoning, and/or filtration upgrades. Full system replacement is a project in itself, and is not usually performed concurrently with the others.

What is the worst thing you could possibly do when upgrading?

Forgetting to use the smart thermostat and monitoring layer. If you don’t have information about your system’s actual performance, you won’t be able to determine what mechanical improvements are actually working and you’ll continue to spend money on repairs that you would have known to perform earlier if you had the information.

author patterson
Author Profile

James Patterson

I’m James Patterson, a writer at Estimators.us. I cover home project pricing, contractor insights, and cost-saving strategies across roofing, remodeling, and energy upgrades. My goal is to translate complex estimates into plain-English guidance so homeowners and small businesses can budget with confidence and avoid surprise costs. I also track market trends, permits, and regional price swings to keep our guides practical and up to date.

How Much Does a Whole Home Remodel Cost in San Diego in 2026

How Much Does a Whole Home Remodel Cost in San Diego in 2026? A Complete Price Breakdown

You can feel like you’re chasing a moving target when budgeting for a major renovation in America’s Finest City. You open one envelope, which offers a contractor who will charge $120,000, and then you open the next one, which calls out for a massive $450,000. Both claims are for the same footprint.

Greed is not the only reason for this discrepancy. In other cases, it is a complete contrast in terms of scope of work, underlying structure and quality of finish. A complete home remodeling in San Diego can cost anywhere from $150 to $450 per square foot in 2026. For a standard 2,000-square-foot project, the range for your base estimate is $300,000 to $900,000.

This guide explains the hidden costs associated with the whole home remodeling expenditures. Keep reading to save yourself from budget overruns.

2026 San Diego Remodeling Tiers

​Your starting point depends on how deeply you plan to cut into the existing structure. Surface-level updates look nothing like structural re-engineering. Below is how the investment breaks down across different execution strategies in the current San Diego market:

Remodel Tier Cost Per Sq. Ft. 1,500 Sq. Ft. Home 2,500 Sq. Ft. Home Typical Scope of Work
Cosmetic $60 – $110 $90K – $165K $150K – $275K Paint, luxury vinyl plank (LVP) flooring, refaced cabinets, minor lighting updates.
Mid-Range $130 – $220 $195K – $330K $325K – $550K Full kitchen/bath gut, mid-grade quartz, layout optimization, partial MEP upgrades.
High-End $250 – $400 $375K – $600K $625K – $1M Structural wall removal, premium oak hardwoods, custom millwork, fully integrated HVAC.
Luxury $400 – $600+ $600K+ $1M+ Architectural footprints altered, imported quartzite, smart-home automation, high-end glazing.

San Diego’s position near the top of national construction cost indexes isn’t an accident. Local labor shortages, strict Title 24 energy efficiency compliance mandates, and geographical shipping premiums push baseline numbers upward.

Infographic

​Zip Code Premiums | All About Coastal vs. Inland Realities

Your permitting process and your labor cost depends on your location. If your project is within the jurisdiction of the California Coastal Commission, then your project dynamics will likely change drastically.

Coastal Tier (La Jolla, Del Mar, Coronado, Encinitas, Solana Beach):

Here, projects will come with a premium of 15% to 25%. Why? Staging logistics, limited street parking for subcontractors, strict HOA design guidelines and the inevitable Coastal Development Permit (CDP) process.

Historic/Character Tier (North Park, Kensington, Mission Hills, La Mesa):

Homes constructed in the 1920-1950 period contain structural problems that are not apparent. These properties often have knob-and-tube wiring, unstable foundations, a lack of modern shear walls, and hazardous materials such as asbestos or lead. When it comes time for upgrading them to conform to the structural codes of 2026, you will have to add a lot to your initial estimates.

Suburbs & Inland Tier (Mira Mesa, Santee, Poway, Chula Vista):

It tends to be closer to standard tracking costs. Also there’s easier access to lots, newer homes (less structural surprises), and expedited municipal permits for construction keep budgets predictable.

Where Your Money Actually Goes

A professional construction estimate doesn’t use generalizations. It is a determined sum of separate trade units. The typical $400,000 mid-range whole home remodeling in San Diego is funded through these buckets of operational capital:

​Kitchen Remodel (20–25%): $80,000 – $100,000

The major force behind the value of residences. This includes semi-custom cabinetry, stone surfaces, plumbing fixtures, rough-in relocations and high-efficiency appliances.

​Bathrooms (2–3 Spaces) (15–20%): $60,000 – $80,000

Dense plumbing, waterproofing, tile work, and electrical circuits.

​Flooring & Surface Finishes (7–10%): $28,000 – $40,000

Use engineered hardwood, large-format tile or high performance vinyl in the main living spaces.

Ready to Win More Projects?

​MEP Upgrades (Mechanical, Electrical, Plumbing) (10–15%): $40,000 – $60,000

Installing 200 amp electrical panel, PEXing copper or galvanized pipes and replacing failing waste lines.

​Interior Architecture & Drywall (5–8%): $20,000 – $32,000

Smooth wall texturing (Level 4 or 5 finish), modern baseboards, casing and low VOC paint.

​Cabinetry & Custom Built-ins (8–12%): $32,000 – $48,000

Custom bedroom/living room millwork, storage solutions and pantries.

​HVAC Systems (4–6%): $16,000 – $24,000

Switching to more efficient heat pumps or multi-zone mini-splits to meet the changing demands of clean energy.

​Design, Engineering & Permitting (8–12%): $32,000 – $48,000

Architectural drafts, structural engineering load-bearing calculations, and municipal plan-check fees.

​Mandatory Construction Contingency (10–15%): $40,000 – $60,000

The barrier that keeps unknown site conditions from stopping construction.

Remodeling Cost Can Go Through The Roof Due To The Following Factors

If you know what makes a budget “manageable” versus “overwhelming,” you can choose to make strategic compromises at the beginning of the design process.

​1. Structural Engineering And An Open Concept Layout

Rather, one of the most sought-after design wishes for any home remodeling in San Diego is the uninterrupted view from the kitchen to the outdoor living area. But, taking out a central load bearing wall isn’t a job for a sledgehammer.

It requires a structural engineer, temporary shoring and the installation of an engineered wood (LVL) or steel I-beam into the ceiling plenum. This one design feature can cost $20,000 to $50,000 when the footings are cast to accommodate the new point loads.

 Structural Engineering

​2. Compliance and Title 24

Because of California’s energy code, remodeling costs are higher than those in other states. If you are doing a full home remodel, you may be motivated to replace fenestration (windows and doors) with the new strict U-Factor requirements, or to add continuous exterior insulation, or the need to replace your water heating system with a high-efficiency heat pump system.

How Long Does Remodeling Take? ​Real-World Timelines

​If a contractor promises a whole home gut in eight weeks, they are likely cutting corners on safety or bypassing the California Contractors State License Board regulations. Quality takes time, specifically in a city where the Development Services Department (DSD) is backlogged.

  • Design & Engineering (6–10 Weeks): This involves site measurements, 3D modeling, and structural engineering.
  • The Permitting “Black Box” (8–16 Weeks): San Diego’s permitting process varies wildly. While some inland projects move quickly, coastal zones or historic districts can languish in review for months.
  • Active Construction (16–32 Weeks): This covers everything from demolition and rough-ins to the final finishes.
  • Total Realistic Window: Expect a 7 to 11-month lifecycle for a comprehensive, permitted transformation.

​ROI Analysis: The 2026 Value Proposition

​With the median home price in San Diego County hovering around $980,000, remodeling is often a purely mathematical decision. The closing costs, commissions, and “mansion taxes” associated with selling and buying a new property can easily exceed $100,000.

​Investing that same capital into your current footprint yields a high Return on Investment (ROI), particularly in specific zones:

  • Minor Kitchen Upgrades: 82% ROI.
  • Bathroom Expansion: 68% ROI.
  • Primary Suite Additions: 62% ROI.
  • Energy Efficiency (Solar/HVAC): 90%+ (when factoring in tax credits and utility savings).

Kitchen Upgrades

The San Diego Factors To Keep In Mind

The geographical challenges are unique in the construction. Expansive clay soils are common in the East County (El Cajon, Lakeside), and special foundation piers, which cost an additional $15,000, are often required for these soils. The salt air requires materials and coatings designed for marine use to avoid early corrosion.

In addition, San Diego Gas & Electric (SDG&E) has very specific service upgrade requirements. The trenching and utility coordination can cost you $5,000 to $8,000 for upgrading your electrical panel from a 100 amp to a 200 amp to support an EV charger or heat pump, which is part of your”Electrical line item.  Companies such as Royalty Design and Build are leaders in this field by giving clients upfront, honest estimates, and making sure the design is feasible within the fiscal constraints of the local San Diego construction market.

​Conclusion

Whole home renovation in San Diego is an investment that requires more than just a “good eye” because it has high stakes. It demands a partner that is familiar with the regulatory environment, the unpredictable nature of the 2026 material supply chain, and the idiosyncrasies of Southern California architecture.

​Frequently Asked Questions

Which is the more economical choice: Remodeling or moving to San Diego?

Unless you are moving to another neighborhood or downsizing, remodeling is typically a more cost-effective solution than closing.

Is a whole house renovation considered a ‘special situation’ for permits?

Yes. The City and County of San Diego must be contacted for any structural, electrical or plumbing modifications or changes so they can ensure safety and resale value.

Will I have to move out while my home is being remodeled?

If an entire gut is being done, no, because of dust, noise and no utilities. Remodeling can be done in phases, but it will be more expensive.

What is the maximum amount of a down payment allowed?

In California, there is a 10% limit on the down payment that a contractor can receive on a project, or $1,000, whichever is less.

How can I check the validity of a contractor’s license?

Go to the California Contractors State License Board website to verify that the license is active, insurance is up-to-date and that the contractor has never had a disciplinary action recorded.

author patterson
Author Profile

James Patterson

I’m James Patterson, a writer at Estimators.us. I cover home project pricing, contractor insights, and cost-saving strategies across roofing, remodeling, and energy upgrades. My goal is to translate complex estimates into plain-English guidance so homeowners and small businesses can budget with confidence and avoid surprise costs. I also track market trends, permits, and regional price swings to keep our guides practical and up to date.

Use Shipping Containers at Events

12 Practical Ways to Use Shipping Containers at Events

Over the last few years, temporary event infrastructure has changed its face. Today, organizers ask for a solid set up which are fast to deploy, reliable for bad weather, visually appealing, and highly efficient to reuse. Shipping containers fit that engineering brief well: they’re modular steel structures with predictable dimensions, excellent stacking strength, and a global ecosystem of parts and fabrication know-how. 

In the 12 ways of shipping containers, we will help you assess how they can be moved with standard equipment, adapted off-site, and installed with minimal disruption on location. For many teams, a versatile shipping container for events approach makes it possible to launch pop-ups, brand experiences, and service zones faster than traditional temporary builds.

Shipping Containers Work Perfectly For Events!

From an engineering view, containers work as standardized building blocks. Loads transfer through corner castings, so lifting and placement are reliable. You can cut walls into doors, hatches, windows, and ventilation in case of well-reinforced openings. Professionals also choose off-site fit-outs to reduce on-site labor and time risk. Remember that you can easily reuse a well-designed unit across multiple venues and seasons. You’ll only need to make minor changes. This ultimately improves ROI and reduces waste. 

Consider The Following Attributes Before Choosing a Container Setup

Core Area What It Covers Estimated Range (USD)
Delivery and placement Transport and tilt-bed/crane/forklift as needed $700–$6,000+
Site prep Leveling, gravel, mats, basic supports $300–$3,500+
Power and HVAC Electrical tie-in or generator + cooling/heating $600–$6,000+
Water and waste Water supply, tanks, pump-out (if required) $200–$2,000+
Connectivity POS internet + attendee engagement Wi-Fi $50–$400
Permits and safety Permits, egress, rails/stairs compliance, fire-safe finishes $300–$3,000+

You must plan for the basics because sometimes even the strongest container idea falls short due to missing points. Ensure these points to ensure perfect execution of the plan! 

  1. Confirm the site alignment with delivery handling and placement. 
  2. Ensure that the ground and setup match the container’s footprint and expected loads. 
  3. Align utilities, including power capacity and climate control. This means understanding taht how the unit will actually operate during peak traffic. 
  4. Above all, keep an eye on permits and safety requirements from day one. This ensures that every point, including interiors, exits, stairs, and railings meet local rules. 

Common Shipping Containers Applications
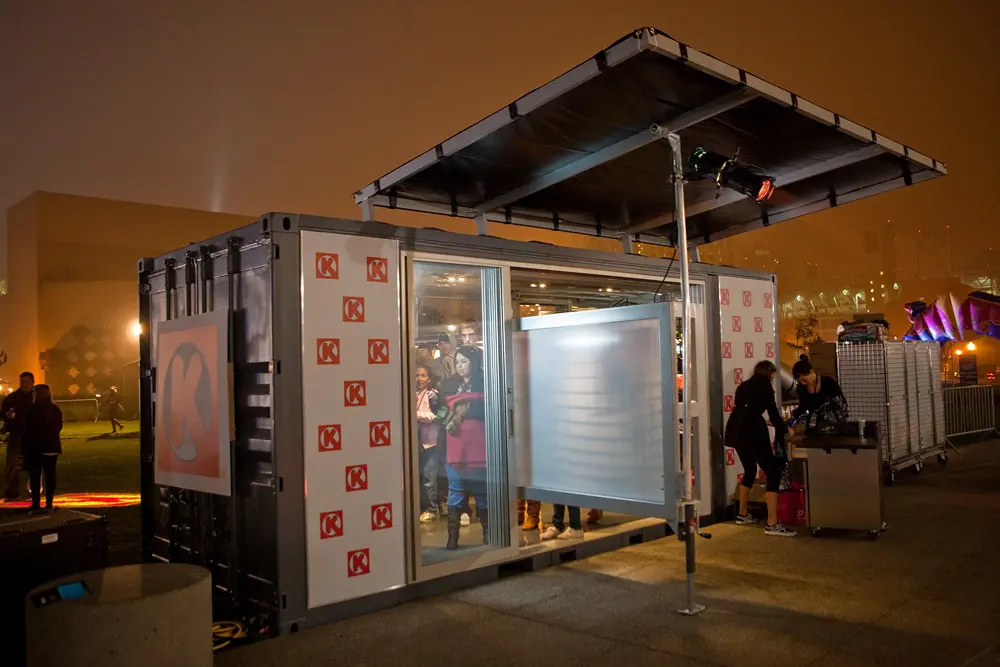
Common Shipping Containers

1) Ticketing and Check-In Booth

A container can operate as a secure ticketing hub with controlled entry points, protected equipment storage, and weather-resistant service windows. Engineers often specify pass-through openings with reinforced frames, integrated cable management, and counter surfaces that handle high throughput if you expect queues, plan for external canopy coverage, stanchion anchoring points, and clear sight lines for staff.

2) Box Office and Will-Call Storage

Will-call operations require organization and security. The option of containers stands out here becuase you can fit them with lockable shelving, internal workstations, and climate control. All this is beneficial to ensure the safety of printed materials and devices. While using this, you should access control and interior lighting levels; it is helpful for verification of accuracy. This also ensures a layout that separates customer interaction from secure storage.

3) Pop-Up Retail Shop

Container retail is popular because the shell naturally supports a controlled storefront experience. When you choose opening panels, they can become a shade. And in the case of interior fit-outs, you can experience permanent retail with slat walls, racks, and display lighting. As per key engineering points, you should focus on ventilation, thermal comfort, and power distribution (particularly when running digital signage, checkout stations, and feature lighting). 

Read More: What is the Average House Exterior Painting Cost in 2025‑2026?

4) Merchandise Fulfillment and Inventory Back-of-House

The second container can function as a back-of-house inventory unit. This reduces restocking delays and reduces loss. What should you do? Where allowed, design for pallet access withclear aisle widths and solid flooring. In case of high volume event, include a small staging area. This will serve for pre-packed orders and controlled staff-only services. 

5) Food Service Kitchen or Prep Unit

Do you know that you can adapt a container into a compact kitchen or prep unit? This option is common among festivals and stadium-adjacent activations. While considering this option, you should be focused on careful mechanical and safety design. This means well-dealing with commercial ventilation hoods, fire suppression (where required), non-slip and cleanable surfaces, grease management, and correct electrical capacity for appliances. Furthermore, you should plan the workflow so there is no conflict between raw and finished food paths. Above all, include handwashing and sanitation points where safety regulations apply

6) Beverage Bar and Serving Counter

A container bar can be fast, stylish, and operationally efficient. Serving hatches should be sized for peak demand, with reinforced frames to handle repeated use. As per professionals, general-purpose access doors are good in this case. As cold stoarges offer limited factors, considering undercounter refrigeration, keg storage, and insulated wall assemblies makes sense. Remember to deal with drainage and spills, considering that sloped floors and easy-clean finishes reduce downtime. 

7) VIP Lounge or Hospitality Suite

When VIP hosting is the target, containers come as an ideal option as they provide privacy, branding control, and a secure footprint. You can also make upgrades in them, including acoustic treatment, HVAC, upscale finishes, and lighting zones. Furthermore, ensure to handle the structural design if you add a rooftop deck. 

8) Brand Activation and Product Demo Lab

If you are working with tech products, automotive components, sports gear, or interactive exhibits, you can transform containers into a controlled demo environment. Engineers offer built-in power, data cabling, mounting points, and controlled lighting containers. In case of screens or VR setups, remember to plan for heat loads, cable routing, and backup power. This will help you avoid interruptions. 

9) Stage Support, DJ Booth, or Control Room

Do you know that production hubs use containers for sound, lighting, and show control? They use them because they can easily add outfitted equipment racks in them. Furthermore, the team can improve isolation by using layered assemblies and sealed penetrations. Above all, a clean organization comes; that includes dedicated circuits, labeling, ventilation for heat-producing gear, and sufficient desk space for operators. 

Get a quote from our professionals today!

10) First Aid, Security, or Command Center

Events often need a visible, durable command post. You can configure containers as first-aid rooms, security offices, or multi-agency coordination centers. When targeting this, you should consider privacy partitions, internal communications infrastructure, secure storage for medical or security equipment, and controlled access points. Set Exterior signage and lighting in a way that makes the unit easy to find, whether day or night.

11) Restroom, Changing, or Shower Facilities

No doubt, portable restroom trailers are common. But container-based facilities are a solid alternative when you desire durability and reusability. This application depends heavily on plumbing. Therefore, you should be focused on water supply, waste management, ventilation, and winterization systems (if applicable). Also, go with moisture-controlling materials and ensure that the layout supports easy cleaning and maintenance. You can add ADA-accessible options where required. 

12) Modular Green Room or Staff Break Area

You can effortlessly improve staff performance by providing them with a place to reset. When hitting this, you can use containers as they can be used as a break room, green room, or volunteer hub with seating, charging stations, lockers, and basic food storage. Regarding design, there is a need for airflow, lighting comfort, sound control, and enough outlets. This will prevent unsafe power-strip overloads. 

Engineering Tips to Make Container Event Builds Safer and More Reliable

  1. Reinforce modified openings properly. Cutting large sidewall sections changes the container’s structural behavior. Reinforcement frames, header beams, and corner continuity should be designed with load paths in mind.
  2. Plan HVAC early. A steel box heats quickly in the sun and loses heat fast in cold. Insulation, ventilation, and correctly sized HVAC are often what separates a cool idea from a comfortable, usable space.
  3. Design for rapid deployment. Use standardized connection points, protected utility inlets, and clear lifting instructions. The less improvisation on-site, the smoother the install.
  4. Prioritize crowd flows. Service window height, queue direction, entry/exit separation, and visibility for staff all affect throughput and safety. Use cubic yard measurements for a better assessment.
  5. Use durable, event-friendly finishes. High-traffic spaces need scuff-resistant surfaces, easy-clean flooring, and protected edges. Small details reduce maintenance during the event.

The Bottom Line

Containers make sense when you plan the setup with considerations on logistics, utilities, and safety requirements. They work for all, from small local gatherings to multi-city tours. 

Start with the site plan and access routes, because delivery and placement constraints often shape the entire design. Next, ensure power, HVAC, and any plumbing setup, as they ensure compliance with local codes. Last, opt for the best modular features: service hatches, removable stairs, or swappable interiors. This way, you can reuse the same setup for another venue. 

And if you avoid all this hassle, call us for assistance! We will give you better options with estimates, ensuring you stay within budget and timelines without affecting quality.


author patterson
Author Profile

James Patterson

I’m James Patterson, a writer at Estimators.us. I cover home project pricing, contractor insights, and cost-saving strategies across roofing, remodeling, and energy upgrades. My goal is to translate complex estimates into plain-English guidance so homeowners and small businesses can budget with confidence and avoid surprise costs. I also track market trends, permits, and regional price swings to keep our guides practical and up to date.

What’s the Average Exterior House Painting Cost in 2025? ($3,000–$7,000)

You are passing through your driveway and stop for a moment. What happened to your house’s outdoor paint? It has weathered, chipped and peeled. Obviously, needs to be repainted. But how much will it cost you? 

The answer isn’t a single number. It’s a shifting target, formed via your property’s length, condition, location, the kind of paint, or even the extent of prep‐work. Whether you’re a homeowner budgeting this year’s projects or a contractor getting ready for your subsequent bid, knowing what drives the expenses allows you to set realistic expectancies.

Average House Exterior Painting Cost in 2025‑2026

In 2025, the cost to paint the outside of a house in the US lies somewhere within the range of $3,000 to $7,000 for many single-family homes under ~2,500 sq ft.

Here’s a simplified table showing the house exterior paint cost, depending on the particular area. 

Home size/type Typical cost range  Notes
~1,000–1,500 sq ft ~$2,000 to ~$4,000 Smaller homes, single‐story, good condition
~2,000–3,000 sq ft ~$4,000 to ~$6,000 Standard size, moderate features
3,000 sq ft+ / multi‐story / complex ~$6,000 to ~$10,000+ Large homes, many angles, detailed trim

Also Read: Average Cost to Paint the Interior of the House

Exterior House Painting Cost Drivers

If you’re a contractor bidding or a homeowner seeking to compare 3 quotes, you’ll need to recognize the following factors. They affect the house exterior paint cost significantly. Understanding them will help you save on all expenses. 

  • Size & Shape of the House:

More square footage, way more paint and more labor, consequently increasing the paint price. Multi‑tale homes require scaffolding or lifts, more secure and special equipment, hence increasing the project expense.

Factor Cost Range
Size of house – small (~1,000‑1,500 sq ft) ~$2,000 – ~$4,000
Size of house – medium (~2,000‑3,000 sq ft) ~$4,000 – ~$6,000
Size of house – large/complex (3,000+ sq ft) ~$6,000 – ~$10,000+

bulding exterior painting

  • Surface Condition & Prep Work

Prep needs increase the cost notably. If your outdoor wall paint is properly maintained, it’s going to be worth much less to repaint. However, a peeling, cracked, left-out surface costs more because of scraping, sanding, and upkeep earlier than the paint goes on. 

  • Type & Quality of Paint

Choose the best between widespread acrylic/latex, premium climate‐resistant, and eco‐friendly paint. Higher fine means higher material price, but it will give you long-term reliable results. 

Factor Cost Range
Paint cost – standard (per gallon) ~$30 – ~$60
Paint cost – premium (per gallon) ~$70 – ~$100
  • Number of Coats

Some paints need two complete coats, especially if changing shade. Similarly, a few jobs require unique trim/accents, more than one coloring. It will encompass extra time, more material, and subsequently extra cost.

  • Region & Labor Rates 

Labor and material charges vary broadly by means of geography. Rural regions frequently have much less to paint the exterior of the house. However, massive metro areas offer a better quality of living and higher costs for painting the house exterior. 

Factor Cost Range
Regional southeast (cost/ft²) ~$1.60 – ~$3.20 
Regional northeast (cost/ft²) ~$2.00 – ~$4.60 
Labor – standard hourly (US averages) ~$25 – ~$75/hour (varies widely)
Per square foot cost range ~$1.50 – ~$4.00+ (variable)
  • Accessibility & Complexity 

Many homes have windows, decorative trim, hard angles, steep roofs, and tall trees within the area, all raise labor time and subsequently wages. Also, homes on hills, uncommon materials, or requiring unique scaffolding cost more to paint.

  • Additional Features & Hidden Costs 

Extra colorings, shutters, gutters, electricity washing, disposal of old coatings; all these kinds of small items and activities add up.

Here is a table for rough estimates. 

Factor Cost Range/ Notes
Regional southeast (cost/ft²) ~$1.60 – ~$3.20 
Regional northeast (cost/ft²) ~$2.00 – ~$4.60 
Hidden/extra costs Repairs, scaffolding, extra colours, and environmental disposal fees

House Exterior Paint Costs Variation Based on Different Regions 

Because location matters, right here’s a region snapshot so that you can benchmark your local cost more realistically. 

Region Approx cost per sq ft Notes & examples
Northeast ~$2.00 – ~$4.60 per sq ft Metro‐areas like Boston, Hartford: higher labor/materials.
Midwest ~$2.10 – ~$4.10 per sq ft Cities like Chicago, South Bend. Moderate cost but can rise with cold climate prep.
Southeast ~$1.60 – ~$3.20 per sq ft Places like Jacksonville, Dothan, GA. Typically, lower cost of living/labor.
Southwest ~$1.70 – ~$3.60 per sq ft Cities like Phoenix, Houston. Dry climate, but sometimes cheaper labor. 
Northwest ~$2.20 – ~$4.70 per sq ft Regions like Seattle, Beaverton are more expensive due to demand and climate.

Example Full‐House Exterior Paint Cost by Region

For a typical 2,000 sq ft single‑story home:

  • Southeast: ~$1.60‑3.20 ×2,000 = ~$3,200 to ~$6,400
  • Northeast: ~$2.00‑4.60 ×2,000 = ~$4,000 to ~$9,200

Exterior-House-Painting

Also Read: How Much Does it Cost to Paint a 1500 Sq. Ft New House

Additional Costs to Consider

A few greater expenses might be buried in your painting quote, so it’s essential to know precisely what’s included.

  • Power Washing

It is often necessary, earlier than painting, to remove dirt, grime, or mold. Power washing can add anywhere from $100 to $300 to the expense, depending on the area of the house.

  • Trim Work

If your house has difficult trim or a couple of colors, the fee of painting trim may be as high as $500 to $1,500, depending on the level of difficulty and the quantity of trim concerned.

  • Disposal Fees

If old paint needs to be scraped or hazardous materials need to be disposed of, the task expense could add another $100 to $500.

What Contractors Should Keep in Mind?

If you’re a contractor bidding on jobs:

  • Always consider the prep work in your estimate.
  • Specify paint brand & quality.
  • Account for scaffolding/ladders when activity top or complexity increases.
  • Consider the seasonal impacts on paint cost, as off-season months result in reduced demand from labor.
  • Provide clients with an accurate cost table showing alternatives so that they understand the choices and make the right decision.
  • Include maintenance costs to add value to your proposal.

Plan Better with Expert Estimating

What Homeowners Should Ask

If you’re getting quotes from multiple contractors, consider the following points:

  • Ask: What’s included? Does the quote cover prep, strength washing, caulking, siding restore, primer, quantity of coats, disposal, and cleanup?
  • Compare prices like for like: same paint emblem/best, equal quantity of coats, identical prep assumptions.
  • Don’t usually choose the bottom bid. If it appears too cheap, check what’s been cut out.
  • Ask for the labor timeline and the way climate/seasonality might affect it.
  • Always consider other outside tasks to get better efficiency from your outdoor paint project plans.
  • Ask your planners about a warranty or guarantee to get long-term best results.  
  • Plan house exterior paint in the off-season so that you can benefit from the lower demands of painting contractors. 

The Seasonal Impact on House Exterior Paint Cost

Like most domestic improvement projects, the cost of outside painting can vary primarily based on the time of 12 months. Spring and summer seasons have a tendency to be the busiest seasons for painting contractors, and as demand rises, so do the prices. If you are willing to look forward to the cold months, you can save up to 10-15% on the overall project expense, especially if the contractor is much less busy at some point during off-season months.

If you choose winter or fall, you can experience a long drying period or project delays due to unfavorable climate conditions. Therefore, you must avoid winters if your house is area where temperatures drop under 50°F. Having your house in a warmer region gives you a choice to plan your house exterior paint accordingly to your convenience. This also helps you spend less and get the best quality outdoor finishes.

DIY vs Professional Hiring

DIY is a good choice to save money on house exterior painting, but it can cost you many dollars if things go wrong. If your house is under 1,500 sq ft, it will cost you between $500 and $1,000 for painting material, equipment, and tools. 

However, if you want to get the best quality long-term benefits from your 1 time investment, hiring a professional must be your choice. They bring years of experience, the right equipment, and a quicker turnaround. Furthermore, when you hire an expert, you’re procuring more than simply effort; you’re investing in nice, precision, and speed. Professionals can get the job done in a few days in place of weeks, and they ensure the outdoor paint last longer.

If you choose DIY, be prepared for a time-eating task, specifically if your house is multiple-tale or if you’re handling a lot of difficult trim or hard-to-attain regions. Additionally, mistakes that include choppy paint or wrong prep paintings can lead to high-priced redoing of sections, doubtlessly making you get out of your budget.

Final Thoughts

House exterior painting is a significant task when it comes to expenses. Therefore, you must plan it smartly. The accurate project budget can be affected by the size of the house, the complexity of the project, the location of your house, and many other factors discussed above. You must understand all these factors to spend less and get the best results. 

If you struggle with the house exterior painting budget, you must get assistance from a professional team at USA Estimators. We aim to provide precise and accurate construction estimates for your house exterior painting project so that you can spend less and get the maximum output. For contractors, we ensure you submit proposals with dependable estimates, enabling you to impress your clients and win the contract. 

Ready to get started? Contact USA Estimators for accurate budget plans for your house exterior paint project! 

author patterson
Author Profile

James Patterson

I’m James Patterson, a writer at Estimators.us. I cover home project pricing, contractor insights, and cost-saving strategies across roofing, remodeling, and energy upgrades. My goal is to translate complex estimates into plain-English guidance so homeowners and small businesses can budget with confidence and avoid surprise costs. I also track market trends, permits, and regional price swings to keep our guides practical and up to date.
Impact door & windows

Why Homeowners Trust SafeGuard Impact Windows and Doors?

If you’ve lived in South Florida long enough, you already know the weather has a mind of its own. One minute it’s sunny and peaceful. And the next? Well, you’re checking the radar and hoping your home is ready. That’s why choosing the right impact windows and doors isn’t just a home improvement project. It’s peace of mind. 

And honestly, homeowners want a company that gets that. One that delivers real protection without making things complicated. This is the reason why a large number of individuals resort to SafeGuard Impact windows and doors when updating their houses.

10 Reasons Why Homeowners Rely on Impact Windows and Doors

1. They Offer Real Protection When the Weather Gets Intense

Here’s the thing: Florida storms don’t play around. Homeowners need products that can take a hit… literally.

Also Read: How Do Floor Access Panels Help Improve Accuracy and Efficiency in Commercial Construction Projects?

The windows and doors are built to withstand flying debris and pressure changes. They are tested to meet some of the toughest building codes in the country. So when the weather starts acting up and you know your home has a good chance of staying secure.

2. Built by the Most Trusted Manufacturers in the Industry

Not all impact windows are created equal. And SafeGuard knows that. Instead of sticking to one brand and they partner with several top manufacturers so homeowners can choose what fits their style and budget.

Manufacturer Known For What Homeowners Love
ES Windows Sleek aluminum systems Energy efficiency, strong glass options
Custom Window Systems (CWS) Florida-engineered vinyl/aluminum Low maintenance, built for coastal weather
PGT Leading hurricane protection brand Miami-Dade approved, reliable performance
CGI Heavy-duty impact systems Architectural style + serious strength

It’s honestly refreshing to see a company offering variety. Not a “one-size-fits-all” approach.

3. Professional Installation Teams Actually Know Florida Homes

Ever had someone install something and you can just tell they don’t understand how homes work in your area? Not a great feeling. SafeGuard’s installers know Florida’s building styles, codes, and all. They’re familiar with everything from older concrete-block homes to newer construction. And since impact products only work as well as the installation behind them, that experience matters a lot.

4. Energy Efficiency That Makes Your Home Feel Better

impact windows

Let’s be honest: air conditioning bills in South Florida can be… painful. Impact windows help more than people expect. The insulated laminated glass finishes are Low-E and help to keep the heat out and the cool air in. There is such a house that is very cool now, breezier, even more comfortable. And over time? You save money. Always a bonus.

5. Extra Security Without Making Your Home Look Like a Fortress

Impact glass is tough to break. Even when it cracks and it stays in place instead of shattering everywhere. That alone is a huge safety upgrade. But the reinforced frames and stronger locks add another layer of protection. You do not need to worry about going out on a weekend or you are sleeping on a stormy night. Everything just feels… safer.

6. A Noticeable Drop in Outside Noise

If you’ve ever wished your home felt a little quieter, this upgrade is a dream. The layered construction of impact windows naturally blocks noise from traffic, loud neighbors, and even construction down the street. You don’t realize how much noise you were putting up with until suddenly… you’re not.

7. UV Protection That Saves Your Interiors

Floors, furniture, artwork… they all fade quick in sunlight.

The glass used in these windows filters out harmful UV rays while still letting your home stay bright. It’s a small detail that ends up protecting some of your most expensive décor.

Ready to Win More Projects? Get Your Free Quote Today

8. A Stress-Free Process From Start to Finish

Nobody wants a home project that drags on forever… or feels confusing. SafeGuard’s process is refreshingly simple:

  • A friendly consultation
  • Help choosing the right style and brand
  • Permit handling (so you don’t deal with that headache)
  • Clean, efficient installation
  • Clear warranty support

It is well coordinated, it is easy and most of all, it is not overwhelming.

Also Read: How Do Drywall Access Panels Save Time & Money in Commercial Construction?

9. A Long-Term Investment With Real Payoff

Impact windows and doors don’t just protect your home. They upgrade it. They are adored by homebuyers, swell with pride by insurance companies and also reduce energy bills due to them. Then whether you are planning to spend the years or even considering selling one day, the value will just continue to add up.

10. Consistent Quality

At the end of the day, homeowners stick with companies that keep their promises. SafeGuard has built its name by delivering strong products, reliable installation and great customer experiences time and time again. There’s no guesswork, no mystery, no pressure. Just solid work and results people can feel good about. And that consistency is a major factor that has won them so much trust in society.

Conclusion

It all depends on the selection of the right windows and doors. Homeowners desire real permanency, comfort and a contractor that knows how the Florida homes operate. SafeGuard has checked all those boxes and more. The products they propose as well as how they take homeowners through all the steps of the process. This is reliability the reason why so many families still prefer SafeGuard impact windows and doors because of its reliability.

author patterson
Author Profile

James Patterson

I’m James Patterson, a writer at Estimators.us. I cover home project pricing, contractor insights, and cost-saving strategies across roofing, remodeling, and energy upgrades. My goal is to translate complex estimates into plain-English guidance so homeowners and small businesses can budget with confidence and avoid surprise costs. I also track market trends, permits, and regional price swings to keep our guides practical and up to date.

Floor Access Panel

How Do Floor Access Panels Help Improve Accuracy and Efficiency in Commercial Construction Projects?

Commercial builds almost always hide messy, necessary stuff underfoot. Autodesk experts state that when this hidden work needs fixing, rework can eat roughly 9% of a project’s total cost when both direct and indirect impacts are counted. That number shows up fast: a missed valve, a wrong cut, a buried junction. Floor access panels stop a lot of that grinding search-and-cut work. They give a clear door to plumbing, wiring and valves. 

These are quick to open and simple to inspect. Besides, it brings no jackhammering, less guessing, and fewer emergency repairs. This blog will highlight the impact of access panels of commercial construction projects accuracy and efficiency. So, if you are a contractor, homeowner or project manager, stick to the end to get a better chance at making informed decisions.

How Do Floor Access Panels Improve Accuracy on Job Sites?

Floor access panels improve accuracy by giving crews a defined entry point to utilities. No guessing, no tearing into finished slabs, and no blind cuts that risk damaging active systems.

Providing Dedicated Access

A properly placed floor access panel creates a fixed, predictable path to what lives below the slab. These include shut-off valves, branch wiring, cleanouts, signal lines, and junction boxes. Without it, workers often face cutting through tile, concrete toppings, or infill materials just to reach a basic connection. 

Read More: What Cost Advantages Do Ceiling Access Panels Bring to Commercial Construction Projects?

A dedicated panel removes that risk entirely. It gives enough clearance to work with tools, verify component orientation, and document conditions without disturbing surrounding finishes. In busy commercial spaces, this consistency prevents accidental hits to nearby conduits or pipes and keeps the floor system intact

Eliminating Guesswork

Guessing the location of a leak or junction is where mistakes multiply. One wrong cut can slice into adjacent runs, kink a conduit, or expose a slab joint you didn’t intend to touch. An access panel eliminates that uncertainty. Crews open it and immediately see the exact valve, coupling, or circuit they’re meant to inspect. 

access-floor-panel

That precision also keeps inspections compliant. Many AHJs require direct visibility of specific connection points before granting approval. With access built in, inspectors move quickly, and contractors avoid delays tied to rework, hidden components, or inaccessible utilities.

In What Ways Do Floor Access Panels Boost Efficiency?

Floor access panels speed up work because crews aren’t tearing apart finished floors just to reach a valve or splice. Access becomes direct, repeatable, and quick instead of a small demolition project.

Faster Inspections and Repairs

An inspector who knows exactly where the shut-off, junction, or cleanout sits can finish a check in minutes. A floor panel makes that possible. Instead of breaking tile or cutting concrete, they lift the lid and see the utility immediately. This matters in areas with dense MEP coordination (data rooms, commercial kitchens, mechanical corridors) where dozens of lines may occupy the same zone. Faster access keeps turnover schedules intact and prevents long outages in working buildings where downtime is expensive.

Reduced Labor and Rework

Cutting into floors is slow, messy, and expensive. One miscut can require patching, refinishing, or even re-pouring a small section of slab. A panel avoids that entirely. Crews bypass:

  • Floor demolition
  • Dust containment setups
  • Finish repairs
  • Extra labor for cleanup

When access is already planned, technicians go straight to the source. Over multi-story projects with recurring maintenance points, these saved hours accumulate fast and show up directly in labor cost reductions.

Minimal Disruption to Other Trades

Job sites move in layers. If one trade tears up flooring, everyone else waits. A floor access panel keeps the disturbance small and localized. For instance, a square footprint instead of a whole corridor. Electricians can work while flooring installers continue nearby. Mechanical crews don’t block painters or finish carpenters. After occupancy, the benefit grows: maintenance teams can open a hatch without shutting down entire rooms or redirecting foot traffic. This prevents schedule ripple effects that often hurt productivity across multiple teams.

Long-Term Cost Savings

Mistaken cuts into conduit or hydronic lines are costly, sometimes thousands per incident once labor, materials, and finish repairs stack up. A floor panel removes that risk by defining the exact access point. Technicians reach valves, traps, or terminations in seconds and skip the demolition every repair would otherwise require.

What Are the Cost Considerations When Specifying Floor Access Panels?

Costs don’t follow a neat formula. One panel might be cheap, the next surprisingly high, and the difference usually comes down to what’s hiding inside it.

access-panel

Material (Steel / Aluminum / Composite)

Material changes the price in a very direct way. A basic 24″ × 24″ aluminum panel usually sits around $800–$1,300, but steel versions run higher because they’re heavier and harder to work with. Composite panels vary a lot. Some are light and simple, some feel closer to metal. Outdoor spots, wet rooms, or spaces with chemical exposure often need treated steel or coated aluminum, and that alone can nudge the cost upward more than people expect.

Load Rating and Hardware Upgrades

Once a panel has to hold real weight (carts, pallet jacks, or even vehicles) everything about it changes. Stronger frame. Thicker plate. Heavier hinges. The whole thing jumps into another category. A 48″ × 48″ H-20 traffic-rated hatch often sits in the $6,700–$8,000+ bracket. If the floor needs a recess or extra support, that’s another separate cost. The load rating tends to be the point where budgets swing suddenly.

Specialty Seals (Watertight / Airtight)

Moisture-prone areas need sealing, and sealed panels aren’t cheap. Compression gaskets, tighter tolerances, deeper flanges, it all adds money. A watertight version of a standard panel can cost several hundred dollars more. Spaces like basements, food service rooms, mechanical pits, or labs usually require this upgrade. And those gaskets wear out eventually, so there’s a small recurring cost people forget to plan for.

Get a professional and budget-friendly estimate from our professionals

Finishes and Flooring Infill Compatibility

A panel meant to disappear under tile, wood, or stone is pricier because it has to sit perfectly flush. A 24″ × 24″ infill-ready panel, depending on finish thickness and hardware, often lands between $1,000 and $3,000+. Custom trims and recessed pans push the numbers higher. Installers also spend more time getting everything level so the panel doesn’t look crooked or create a small lip that catches shoes or carts.

Also Read: How Do Drywall Access Panels Save Time & Money in Commercial Construction?

Typical Price Ranges (Summary Table)

Panel Type Typical Use Estimated Price Range
Standard aluminum hatch (24″ × 24″) Light service areas, basic utility access $800–$1,300+
Mid-duty infill panel (24″ × 24″) Finished spaces, tile/wood/stone infill $1,000–$3,000+
Heavy-duty H-20 / vehicular (48″ × 48″) Loading docks, garages, equipment traffic $6,700–$8,000+
Fire-rated, watertight, or custom models Labs, basements, specialty environments $10,000–$15,000+

These prices don’t include shipping, custom sizing, or installation time, and those add-ons can swing things more than the panel itself.

FAQs

What’s the cost for a small floor access panel?

A basic 24″ × 24″ aluminum panel often ends up around $800–$1,300. But coatings, infill pans, and uncommon finish depths can bump it higher without much warning.

When would someone actually need a heavy-duty or traffic-rated panel?

If forklifts, pallet jacks, or service vehicles cross that floor, you need a traffic-rated model. A 48″ × 48″ H-20 hatch typically runs $6,700–$8,000+.

Are watertight floor panels really necessary in typical commercial buildings?

Sometimes absolutely. Basements, food rooms, and any slab area with moisture issues benefit from them. The upgrade costs a few hundred dollars but prevents repairs that cost far more.

The Key Takeaway

Floor access panels aren’t just “nice to have.” They help prevent rework and that matters, because rework eats up about 5–10% of total project costs. By planning and placing covers early, you control risk, tighten up inspection workflows, and avoid hidden demolition later. These panels keep systems reachable and floors intact, and they deliver real savings and fewer surprises across the building’s lifecycle.

author patterson
Author Profile

James Patterson

I’m James Patterson, a writer at Estimators.us. I cover home project pricing, contractor insights, and cost-saving strategies across roofing, remodeling, and energy upgrades. My goal is to translate complex estimates into plain-English guidance so homeowners and small businesses can budget with confidence and avoid surprise costs. I also track market trends, permits, and regional price swings to keep our guides practical and up to date.
Celling access panels

What Cost Advantages Do Ceiling Access Panels Bring to Commercial Construction Projects?

Tired of expensive repairs of ceilings and the slow pace of maintenance delaying your projects? Ceiling access panels are introduced to smart builders to reduce the time required for repairs, prevent damage, and lower the overall project cost. The following way these panels deliver a real commercial construction cost advantage to the knowledge. 

Why Access Panels Matter in Commercial Builds?

Ceiling access panels are important in ensuring that commercial projects are efficient, economical and simple to maintain. They can ensure that interior finishes are safeguarded by reducing invasive ceiling cuts, making repairs faster and reducing downtime in occupied spaces significantly with a standard price of $10 to $400 and an expected cost of installation of about $200-$500 per unit. That is the reason they provide one of the highest ROI upgrades in contemporary construction. 

Located correctly, access panels will assist the teams to prevent rework, reduce interruptions and performance of the building over the long term despite the need to access the HVAC, electrical and plumbing systems.

Also Read: How Do Drywall Access Panels Save Time & Money in Commercial Construction?

Key Cost Advantages of Ceiling Access Panels in Commercial Construction

Reduced Maintenance Labor Costs

Ceiling access panels save service time directly by allowing access to HVAC, electrical and plumbing systems. Rather than chopping holes in the ceiling and sealing them afterwards, technicians can finish work 20-40% quicker, decreasing the number of billable labor hours and accelerating regular check-ups on busy business areas. 

cost of access panels

Lower Ceiling Repair and Restoration Costs

Each time a ceiling is unscrewed without a panel, companies have to incur an extra expense of $200-$500+ in repairs, patching and putting in a fresh coat of paint. That is almost free after installation with an access panel. This not only saves a repeat of the restoration work but also maintains interior finishes clean, even and unharmed. 

Minimizes Business Downtime

Downtime is costly in places such as the retail stores, hospitals, hotels and offices. Cutting, repairing and repainting ceilings can effectively put a part of a building out for a few hours or days. The access panels make it easier and they also reduce the maintenance period by half or more and the business can remain fully operational with minimal disturbances. 

Higher Lifecycle ROI

A typical ceiling access panel would range in cost between $200-$500 installed, yet the savings in the long run would be significant. These panels will save thousands of dollars throughout the life of a building. This is compared to traditional ceiling panels. The savings come from eliminating the need to repair broken ceilings and saving labor hours. They also provide the fastest possible access to a system. This all proves them to be one of the highest payback additions in the commercial building industry.

Prevents Code Violations and Rework Costs

Fire-rated ceiling systems should have appropriate fire-rated access points. The improper panel may cause inspection failure, rework that is expensive to do or a delay of the project. By installing fire-rated access panels that are compliant and of adequate this risk is completely removed and keeping your budget intact and even keeping your project safe and code-ready at the start.

Typical Cost Components of a Ceiling Access Panel

Product Cost (Material Type and Build Quality)

The ceiling access panel itself will cost much depending on the material used, size and fire-rating. Standard metal or plastic panels are usually sold between $10-$400, whereas the expensive flush drywall or tile-in or acoustical panels are sold at a higher price because of their better appearance and stability. The most costly are fire rated models which can range between $250 and $2000 due to the certification and insulation. Choosing the right panel balances budget, performance and code compliance.

Installation and Labor Costs

Ceiling access panels are also subject to a high cost in regard to labor. Simple ceiling installs take an average of $200-$500 which includes the panel. Such complicated installations as fire-rated panels, reinforced framing or unique finishes need more skilled labor and time. Proper installation will allow the panel to install flat, work well and avoid damage to the ceiling which will save your investment and reduce future repair and compliance problems.

Lifecycle and Long-Term Costs

Lifecycle costs are usually greater than the initial purchasing and installation costs. In the absence of ceiling access panels, the process of maintenance may involve cutting, patching, and repainting which is estimated to cost $200 to $500 and above per service procedure. In the long run this translates to thousands of unnecessary repair expenses on the building. Panels save time on labor, offer finishes and fasten diagnostics, which would save significant time in the long run, which is why they are a high ROI option in a commercial construction project.

Here are some estimates for standard ceiling access panels.

Size Steel (Basic) Aluminum (Basic) Plastic / PVC Gypsum / Drywall Fire-Rated Option
12×12″ $25 – $75 $35 – $95 $15 – $45 $30 – $75 $150 – $300
18×18″ $45 – $160 $55 – $180 $20 – $65 $50 – $150 $200 – $400
24×24″ $70 – $230 $80 – $260 $30 – $95 $65 – $210 $250 – $500
36×36″ $150 – $350 $175 – $380 $60 – $180 $140 – $300 $400 – $750
48×48″ $220 – $520 $250 – $620 $100 – $280 $200 – $440 $500 – $1,000

How Access Panels Reduce Repair Costs and Extend Ceiling Life?

Intelligent ceiling access panels are also a good selection when it comes to commercial buildings since they will not end up causing deprivation of repetitive ceiling damage during maintenance. Technicians have to drill through drywall or plaster to do the HVAC, electrical work and plumbing, which can cost them up to $200-$500+ repair. Access panels do away with this requirement, leaving ceilings intact and finishes intact. 

Access Panels Reduce Repair Costs

These panels will enable the reduction of wear and tear on ceiling materials, less patching and repainting and increase the total lifespan of the ceiling since direct, reusable access is available. This reduces the cost of repair over time besides ensuring the building’s aesthetics and structural stability.

Quantifying Downtime Savings for Commercial Buildings

Ceiling access panels save a lot of time relating to maintenance of busy commercial areas. Traditional ceiling repairs may close off areas in retail outlets, offices or hospitals and influence revenues and productivity by taking hours or days. Maintenance time is also cut by 30-50% with access panels, which means that technicians can operate fast without causing any disturbance in operations. 

Not only does this accelerated access save money in terms of labor, but it also keeps businesses fully operational which makes the day-to-day operations run smoothly and the overall efficiency increases.

When to Choose Fire-Rated vs Non-Fire-Rated Panels?

The choice of a proper access panel ceiling type is an important consideration that is concerned with safety, compliance and cost-efficiency. There are non-fire-rated panels that suit normal ceiling applications where building codes do not demand rated assemblies. They are cheaper, installable and suitable for general maintenance access.

Also Read: Why Should Fire-Rated Access Doors Be Included in Commercial Construction Estimates?

However, here, fire-rated panels should be used in ceilings that interpenetrate fire-rated assemblies such as in hospitals, schools and in commercial buildings with high code standards. These panels are expensive as a result of insulation, UL certification and other installation processes. Although it will be more costly in the short run, they will eliminate code violations, expensive rework and inspection failures, saving your investment and ensuring long-term safety. The selection of the correct panel type trades off compliance, functionality and lifecycle cost savings.

Design, Size and Finish Options That Affect Cost

Ceiling access panels are available in different designs, sizes and finishes, all of which influence the cost and functionality. Frames made of standard metal are cheap, whereas flush drywall or tile-in panels are not only incompatible with ceilings, but also are more expensive.

Making larger panels or even custom sizes adds both material and labor costs, and finishes such as painted surfaces, inlays or security locks add to the price. The choice of the appropriate mix guarantees the aesthetic value, usefulness and extended savings without affecting the quality of the project.

Ready to Win More Projects?

Best Placement and Coordination Tips to Avoid Costly Rework

The positioning of access doors and panels is strategic to ensure that there is easy maintenance, less labor expenditure and no costly rework. The coordination and design between the MEP engineers and contractors and the architects is significant. When making decisions concerning locations, functionality and aesthetics ought to be considered.

Placement tips:

  • Position near HVAC, plumbing and electrical systems for direct access.
  • It is not necessary to visit high-traffic or sensitive areas.
  • Combine multiple systems as much as you can in order to reduce the number of openings.
  • Coordinate with ceiling lights, ducts and structural components to avoid conflicts.
  • BIM/CAD drawings should include panel locations as a good way of planning construction.

ROI Case Study

Real Cost Savings Examples

Ceiling access panels can save a lot in the long run. In the case of a small office fit-out of 10 panels, the yearly maintenance costs are reduced by $1500-$2000. In a mid-size retail environment of 30 panels, this can $5000–$7000 per year in repair and labor costs. Additionally a hospital wing of 50 fire-rated panels will not have to spend thousands of dollars in downtime and ceiling repair and this will save thousands of dollars in lifecycle savings over the life of the structure.

Specification and Procurement Checklist

Make sure your access panels meet project requirements by including key details in your RFP:

  • Panel size, material and finish
  • Fire rating and UL certification if required
  • Installation method and labor expectations
  • Lock type or security features
  • Warranty and maintenance instructions
  • Delivery lead times and inspection criteria

Conclusion

Ceiling access panels can bring commercial projects measurably low costs such as lowered costs of repair and labor, minimized downtime and increased lifecycle ROI. The right choice, positioning and installation will provide the savings in the long term without renovating the appearance of the building and its compliance. For expert guidance on specifying, sourcing and installing access panels, trust USA Estimators. Share your project information now and receive a free cost analysis customized to your commercial space!

FAQs

How expensive would ceiling access panels in a business building be?

The common ceiling access panels cost between $10 and $400 to get regular versions and the overall cost of installing the panel is between $200 and $500 on average. Both fire-rated or custom panels are more expensive but they cost less in the long run less in labor and repair making them a worthwhile investment in commercial building.

Will fire-rated access panels eliminate the expensive rework?

Yes. Access panels are fire-rated and in accordance with building code and UL standards. Proper selection of the panel type will ensure zero inspection failures, costly rework will be avoided and you will not put your project budget at risk and the same time keeping your project safe and functional.  

Do access panels lower the cost of maintenance?

Ceiling access panels enable direct access to HVAC, plumbing and electrical systems that resulting in fewer labor hours and avoiding damage to ceilings and eliminating patching or repainting. This reduces the general costs of repairs and prolongs the lifespan of the ceilings of the building.


author patterson
Author Profile

James Patterson

I’m James Patterson, a writer at Estimators.us. I cover home project pricing, contractor insights, and cost-saving strategies across roofing, remodeling, and energy upgrades. My goal is to translate complex estimates into plain-English guidance so homeowners and small businesses can budget with confidence and avoid surprise costs. I also track market trends, permits, and regional price swings to keep our guides practical and up to date.